Monday, August 28, 2017

BEE HAPPY Color Sheet- FREE

This is one of the Large Stickers on my "Bee Happy" Full Page Sticker Sheet that you can download on my Etsy Shop

Sketchbook Rough Drawing
Bee edited in Photoshop
I am having a blast and this is SO MUCH fun!  Actually, it is a bit of a challenge for me to draw a simple designs after years of trying to draw every small detail.  It's a different way of thinking but it is kind of freeing.  The designs are bare bones and on their own not too impressive, but add some color and create an interesting composition and their simplicity turns into their beauty.  This little bee may be simple and cartoon like, yet when I pulled him into Photoshop and gave him a little color with my paint bucket tool he is transformed into an attention catching illustration.

Arrangement consisting of the 2 flowers and the bee


The flowers are nothing special but I decided to make 2 different varieties of each design.  Once you have each element edited and color added you are now ready to create a composition.  I decided to surround the bee with colorful flowers.  I was careful not to let his wings be hidden by blending into the blue flowers.  I wanted every portion of the bee to stand out and not be lost.

Wrapping Paper available on my Zazzle Shop
Repeating pattern design

You can see that once you have your basic composition created that than you can work into creating a repeating pattern.  Repeating pattern designs can be used to create the artwork for many images including fabrics and wrapping paper.


Here you will see that I have added this pattern to a roll of wrapping paper that is available on my ZAZZLE SHOP along with a lot of other cool merchandise that feature my artwork.  Also check out my ETSY SHOP for more original artwork.


Yesterday, I turned my attention to one of my favorite subjects, FARM ANIMALS and created a series of drawings that included a cow, pig and a rooster.  I have the cow shown here.  I can now make a variety of colors but this one is of my Holstein.  I know for certain I will be creating a set of stickers using these comical creatures but really the sky is the limit on what I will eventually create.  That is the amazing thing about using my art in a graphics program like Photoshop.

Next I want to learn how to do more painting so that I can add some depth and contrast to these images.


I realize that I am just using the bare basics of the graphic capability of my software but keeping in mind that just 2 months ago all I used Photoshop for was to crop my images and now I am actually using it to create art.  To say I am thrilled about this new knowledge is an understatement.  I have had so many comments from other artists asking if I would teach a class or about how I learned to use Photoshop.  Well let me just state here that my path wasn't hard but I was determined.

First, I made a list of 5 things I wanted to learn how to do in Photoshop.  I picked something I really wanted to learn how to make and that was a page of stickers.  I started watching YouTube videos on making stickers in Photoshop.  I found one that seemed to make more sense to me and was very basic.  I took lots of notes and followed her process step by step.  Pausing the video so I could match what she had just done.  That wasn't always the easiest thing because I own an older version of Photoshop Elements and so many of the options are not the same but I looked around until I found it on my version.  The first thing I created was a bit crude but I felt that I had accomplished a great thing.  My advise to you is to GO FOR IT!  Carve out several days with just you and your computer and  YouTube.

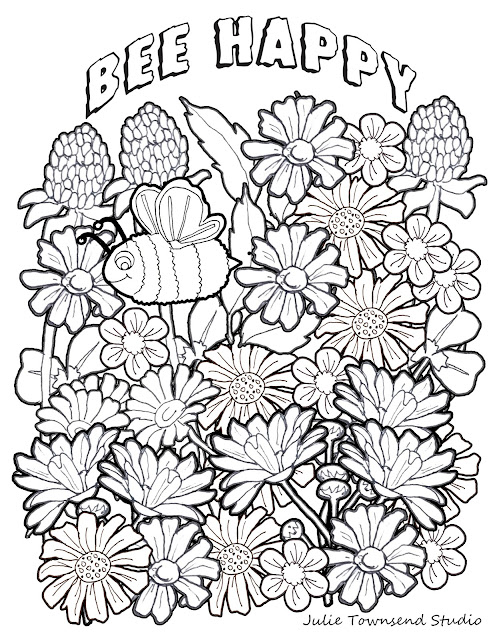
Here is my first ever "Bee Happy Coloring Sheet" created just today. I have had so much fun working on this that I want you to BEE HAPPY TOO!   I am providing you as my blog reader a link so that you can download and print this out to color and enjoy.   (The Bee Happy Coloring Sheet is for personal use only and may not be reproduced or sold without my written permission)

FREE BEE HAPPY COLORING SHEET


Tuesday, August 22, 2017

I Love my RedBubble Bubblebees

A Bumblebee that I sketched
I am at about a week and half of my proclaimed "Art Sabbatical" and I'm trying to stay focused.  I have probably spent more time on the computer in Photoshop than I have creating art these past couple days.

My time has mostly been spent working out designs on a number of products to fill my Zazzle Shop.  While I have had no sales yet on Zazzle, I am having a lot of fun creating this unique items that feature my artwork. I do believe that if I keep creating cute designs that sales will come.  Right now I have mostly focused on t-shirts and coffee mugs, as these I would guess would be favorites for gift purchases.

Here is one thing I did manage to create in the past few days.  Just a little sketch in my sketchbook of a bumblebee.  Funny enough, I actually got a lot of positive response from this little sketch on my social media accounts.  One thing I do not have access to is my scanner/printer here on my little art get-away so I have only my cellphone to capture and share my artwork right now.  That didn't stop me as you will see further in this blog post all the designs I have created using just this one little lone bumblebee.


A t-shirt created from my artwork "Up, Up and Away" 
I'm trying the service out by ordering two matching t-shirts for my granddaughters whose birthdays are coming up in just a few weeks.  I was very pleased yesterday to find that I was ordering them just as Zazzle was offering a 50% off on all t-shirt orders.  That was a double bonus in my books.  I will blog about the quality of the t-shirts and how I feel as the artist when I see my design on printed fabric.

The one thing I really like about Zazzle.com is the ability to actually design your item.  You can upload multiple images and add text using a variety of fun looking fonts. This gives you the ability to make a variety of text or image changes to your product allowing for the ease in creating similar but unique products.  I like this freedom.   My other shops on Etsy and RedBubble do not allow this freedom.  You will have to work in Photoshop to have the designs completed first and then upload them for each item separately.  Etsy charges you .20 for each product and the stress there is having up to 10 really good photo images of your handmade item.

Redbubble.com, like Zazzle, offer a wide variety of products for you to put your image on.  It states on it's website that it is a Global Marketplace for Independent Artists.  What I really appreciate about Redbubble is the fact that it allows your image to be uploaded on all the products at the same time.  You just can work your way down the page making edits to the images based on each products. There is a wide range of products range so your image can be ordered on items like t-shirts, scarves, notebooks and clocks.

Bubblebees added to my pink peony design
Here are a few of the images that I created this week that focus on just that one bumblebee sketch.  I have added flowers of different varieties, scriptures verses and created a repeating pattern that would work well on gift bags, wrapping paper and maybe even tablecloths.  I fell I am getting one step closer to creating a portfolio for art licensing.
flowers from pngtree.com - bumblebee is my original artwork
 Artwork used to make the repeating pattern

Creating a repeating pattern using the Bumblebee


Email from RedBubble notifying me of 1 of my 2 sales for the day
I should note that I have had some of my images on RedBubble for quite sometime but have just recently started updating the site with my newest works.  I was beyond thrilled yesterday when I received notification not once, but twice that I had sold items on RedBubble with my images on them.  Now royalties are much to really write about, but the great thing about "Print on Demand" is that once you have taken the time to upload the image the money is really effort free.  I just wait to collect my automatic PalPal deposit.  The image "Bees in Flowers-Yellow", I had just uploaded a few hours before.  Here is the email notification I received.  I love how encouraging it is.  I'm hoping to start seeing royalties from both Zazzle and RedBubble become a monthly occurrence.

I just wanted to show off one last thing I created in Zazzle yesterday.  I created buttons for Brad and I to wear at art shows or festivals that identify who I am as the artist just like a name badge would.  The button I made for Brad is rather humorous so I just had to share.  He claims he WILL wear it but we shall see.


To check out all my products just click on these links and let me know what you think.

Julie Townsend- Zazzle Shop

Julie Townsend- Redbubble

Julie Townsend- Etsy Shop


Friday, August 18, 2017

I Love the SPOT HEALING BRUSH TOOL

Isn't that just the coolest name?  Wouldn't it be awesome if we had a SPOT HEALING BRUSH TOOL in our make-up bag.  Oh look at that wrinkle or giant lunch food stain that is prominently residing on the front of my blouse-  I could just pull out my SPOT HEALING BRUSH TOOL and presto...spot, wrinkle, pimple or stain BE GONE!

Yesterday, I spent several hours just quickly going through some past photos looking for something that would spark my Photoshop imagination.  It didn't take long for me to stop on this photo.  Absolutely amazing Nevada sunrise that is completely ruined by the heavy power lines.  I have always wanted to edit that photo to try to create that beautiful scene that I remember. 
That is where the "SPOT HEALING BRUSH TOOL" came in.  I'm sure there are a number of ways to FIX this photo but after a quick internet search I decided to give this tool a try.  Just a little Photoshop history on me....About 6 weeks ago, I knew absolutely knew nothing beyond cropping a photo. With determination I set aside a weekend and began painstakingly watching YouTube videos in an effort to learn how to do some simple photo editing.

My main motivation is my artwork.  I have for a long time felt that learning Photoshop was essential for me to take my art to the next level.  I'm pretty happy with my progress and am determined to become proficient.  Now, I also should mention here that I don't actually own Photoshop or whatever they are calling it these days but rather I own an old version 8 of Photoshop Elements.  The current version is 15 but I wasn't about to spend a dime to purchase another program when I didn't even know how to use the one I have owned for years.

I am happy to report that last night I noticed Photoshop Elements 15 was once again on Amazon Prime, offered at the lowest price I have found of $59.99.  Usually it is listed at $79.99.  Only one other time had I seen it that price and didn't buy it soon enough and the price jumped the $20 while it sat in my shopping cart.  I wasn't about to repeat that scenario, so I quickly made my purchase and can't wait to load it on my laptop when it arrives.

Now I had better get back to my whole purpose to this post and that is my sunrise photo.  The SPOT HEALING BRUSH TOOL did the trick.  It was a bit of a time consuming process because I had to keep going back over the lines before they were completely gone and there was no distortion left.  My patience paid off and I couldn't be happier with this edited photo.  

I was SO happy as a matter of fact that I decided to get a little silly and so I then edited this photo we took last spring of a street performer in Virginia City, Nevada dressed as an old prospector complete with his burro.  Here it is added to the sunrise photo looking sillier than ever.


Wednesday, August 16, 2017

Trying to Capture Silly With My Pen

Trying to capture humor and silliness with just a ink pen can be a challenge.  I'm working on some ideas for a solo show I have coming up in March 2018.  I'm sort of known for creating art that results in some smiles and sometimes out loud laughter.  For a theme, I'm considering calling the show, "I Dare You Not To Smile"

Now that is a tall order but here in the past 2 days I've picked up the challenge and decided I would share a couple of the pieces I have made. Let me take a minute and introduce you to my growing menagerie of silly creatures.


Claire the Cow


First off, we have Claire the Cow.  Created with mostly scribbles or stippling of my pen she has a rather long narrow face and blank stare that is sure to cause a chuckle.  Not to mention that double, triple, quadruple chin action going on there.

There is just something about cows.  Even though they are very large and rather intimidating, they have a sweetness about them. They have the largest brown eyes and the most interesting nose.  I LOVE drawing and painting their noses.


Rusty the Rooster


Next we have a feisty fowl that rules the coop.  Rusty the Rooster is one comical cock full of attitude.   Look into his eyes and you will have to decided if he is thinking either "What are you laughing at?" or "You had better get ready to run!"  He is lightly tented with colored pencil to show off his amazing comb and wattles.


Lily the Llama


The ink may still be wet in spots on my newest drawing.  Here is Lily the Llama.  What a funny face that llamas have. I mean I knew that they had goofy faces but it isn't until you start to study them to actually draw them that you realize just how goofy they really are.  Two large yellowed teeth protruding out from their bottom lips, giant bug eyes and hair sticking out everywhere.   Not the typical farm animal, but I have seen a number of them in pastures as I drive across rural ranch land so I decided to include her in my silly farm animal lineup.

Just as I did with Rusty, I have tinted Lily with blue colored pencil to enhance the shadows of her face contours.

Now what shall I draw today...?


If you like my artwork consider checking out my Etsy Shop, Zazzle Shop or my Website.  All are available by just selecting the tab above.


Tuesday, August 15, 2017

NO LIMITS in Sight


Just Like in This Image....My Art is Now FREE TO FLY

I am on a SABBATICAL....well that is what I have been calling it but I guess it is more correct to say that I'm on an art vacation.  When I looked up the definition of sabbatical and I found out that they last usually a year.  I don't see me putting aside my other obligations for that length of time, but I am determined to make the most of this small window of time I have carved out to really produce more art and to improve my online presence.

I will be blogging regularly, showing off my newest art creations.  I will be working on making some holiday collections along with images for my March 2018 show..."I Dare You Not to Smile" that will be presented at the Boulder City Art Gallery in Boulder City, Nevada.

For the past month I have been learning to combine my artwork and digital enhancements using Photoshop.  I love the freedom that this program gives me with my artwork.  I can fix things, combine separate elements together to change up the compositions and add backgrounds or foregrounds.


Up, Up and Away
Digitally Improved


Here is an example of what I worked on yesterday using a painting I did a year ago.   Up, Up and Away was painted especially for my grandson Hunter.  His nursery was decorated in elephants and my daughter asked me to do a special artwork piece to hang there.  This painting was done on a 16 x 20 canvas in Acrylics.

Because of the way I had painted the balloons I felt that I wasn't really able to produce prints or add the image to cards and magnets as I usually do with my work.    Yesterday afternoon I pulled up the image onto my laptop and began working some Photoshop magic on it.  I removed the original balloons and the little mouse I painted hanging on the elephants tail.  I then downloaded some royalty free png file  images of balloons, a stowaway mouse and the blue sky background and I now have a great image that I believe very marketable.


Here is a mockup I created using my Up, Up and Away artwork. Mockups are made to help you visualize just how this image would look if place in the environment of it's intended use.  I think this is now such a cute image that your imagination doesn't really need the extra help to know that this little flying elephant would be perfect hanging in a nursery or child's bedroom.  If you are an elephant person I suppose that any room might work for you.   I have added this print to my Etsy Shop and it will be available for order at this link:  Etsy Shop- Elephant Print


I've added this image with different sayings to both a Child and Toddler T-shirt.  I'm planning on ordering them for my two granddaughters birthdays coming up next month.
 

Zazzle Shop-Elephant T-Shirt 
Zazzle Shop-Elephant Toddler Shirt 


Making the effort to learn just a little Photoshop has opened an ability for me to take my art to a new level.  In my heart I knew it would but each time I tried to learn to use the program for more than cropping the photo I grew frustrated.  I tried on several occasions to learn from my children, which resulted in...INSTANT FRUSTRATION!

What was different this time?  First I made a list of about 5 things I really wanted to learn how to do and then I started watching YouTube videos.  I know this may sound funny, but I have been fascinated with stickers for sometime and I really wanted to learn how to make them.  I watched several videos before finding one that made sense to me.  I took notes and then spent a whole day working on making a sheet of poorly done stickers, but I learned how the layers work.  This had always been the mystery to me and as you know if you know anything about Photoshop, it is ALL ABOUT LAYERS.

I have also been taking my edited JPEGS of my artwork and adding them to a number of products in my Zazzle Shop.  Mostly coffee mugs and T-Shirts at this point, but I think they look great and am confident that I will be earning some small royalties on these images soon.  Here is several examples of my coffee mugs and an easy to use link in the event you might just want to order one for yourself or to give as a gift.


Zazzle Shop- Online Dating Sparrow Mug


Wednesday, August 9, 2017

Some Days Chicken, Some Days Sparrow Feathers


This past week I have been running around like a chicken with my head cut off getting my artwork ready to hang at the Art House LV Gallery for the collaboration show "Fur, Feathers and Fins".  I don't think I had one fish or reptile on display, but I sure had plenty of Feathers represented on my wall.

Both of these sparrow pieces made their public debut at the show and I couldn't be more pleased at how they looked hanging there among the whole display.  I find myself more and more opting for my color pencils and ignoring my paintbrushes.
This little grouping of sparrows that I call "Early Morning Flock Talk" is drawn in color pencil and measures about 6 x 15 I think.  When I started drawing this, I already had the frame and that is the reason for the long narrow size.  I didn't really consider how I was going to make matted prints of it though.  I usually steer clear of odd sizes when painting on canvases or matting my drawings.  It just isn't very cost effective to have to have framing specially made.   It turns out it has been a popular piece and so I had to figure out a way to make this long and narrow drawing into a more standard size such as 5 x 7 or 8 x 10.

So, today I turned to Photoshop for a little help.  I downloaded some grass and wildflower pictures from my new favoritest website ever-Pngtree.com.  I lengthened this size of the fence posts and then just layered the grass and flowers in front of my drawing.  This gives both height and depth to my drawing.


So here is the final result.  I think this will be a print that I will sell often and the image will look great on other merchandise.


My second sparrow piece is one I call "Online Dating" and features both a male and female sparrow sitting on a clothesline surrounded by wooden clothespins.  In my final drawing of the piece I have light blue background that I colored in and I decided to add a butterfly and two yellow and green stripped wash rags to the pins.
As a child we never owned a clothes dryer.  One of my household chores was to hang the laundry out on the line.  I don't have memories of beautiful butterflies floating overhead but rather giant horseflies dive bombing me as I struggled to hang the wet laundry and secure it on the clothesline.  This drawing is 8 x 10 and I have it matted to 11 x 14.  So it is a nice size.


I did decided to take the composition and change it up a bit digitally.  I extended the clothesline and added a couple more clothespins.  A bright digital background and I think my little love birds really pop now.


One more piece that I worked on this week still focused on birds but not sparrows.  I started with a sketch of a rooster that is probably classified a zentangle.  Primarily in blue, teal and purple ink, this guy is not only colorful but has an air of superiority to him.  Much like the for real breathing variety.

I knew right away that I was going to have to draw him a cute chicky girlfriend.  Since they both were separate sketches, I had to turn to Photoshop to create a romantic scene.  What says romance more than a field of beautiful wildflowers?  I suppose if I had thought it through, I would have them wings outstretched and running towards each other. (Maybe this should be my next masterpiece).

I love adding a dropped shadow behind both the rooster and the hen.  This gives a more 3-D appearance and they actually seem to be resting above the surface of the background image.

I'm just having so much fun combining my artwork with digital modifications.  Gosh...I LOVE my job!


As a grouping, these chickens sure make an adorable trio that would look great in any room and go with any country or farm decor.


All of these images are available as glossy matted prints on my Etsy Shop and are in a variety of sizes.  You should just hop on over they and take a look.  Julie Townsend Studio- Etsy Shop


Sunday, August 6, 2017

Making Mockups Almost Like a Pro

It has been a very busy time in the studio as of late.  I've been jumping around like a chicken with my head cut off just trying to stay on track.  I find myself the week of my combined show where I am 1/3 of the art exhibit and even with that load shared it is a great deal of work.  Our theme is "Fur, Feathers and Fins and it is turning out to be a really fun show.

Besides all of that flurry of activity I have spent a great deal of time on my computer working to improve the product pictures on my Etsy Shop.  I developed about 4 room templates that allow me to showcase my artwork framed and hanging on an imaginary digital wall. I can adjust the frame orientation and size because they are all separate layers in Photoshop.  Having these templates created are half the battle.   Now I'm sure there are more professional images out there but I'm pleased with the outcome of these mockups and wanted to share them with you.


Here are my current mockups and I really like the country flair of the barn wood frame and the potted red geranium.  Makes my Rooster painting, "Rise and Shine"Rise and Shine a perfect fit.  I couldn't have found a better mockup design for my giraffe painting "Reach for the Sky"Reach for the Sky then this little stuffed elephant on a distressed turquoise chair.


For my line of art magnets I decided to create a mockup of a refrigerator surface with a number of my images attached to appear as magnets. When I was showing all the templates to my husband mostly because I feel that I have to justify to him for all the hours I have spent sitting in front of the computer screen in the past 4 weeks since learning anything Photoshop, to point out to me that magnets wouldn't attach to a stainless surface.  REALLY!  I do know this, but you are supposed to focus on the beautiful artwork not the refrigerator.

Both of the originals of these two paintings have been sold but the good news is that I can create fine art prints of both of them and I offer them on my Etsy Shop up to an 8 x 10 matted to 11 x 14 size.  Prices range from $5 to $50 depending the size of the print and if you want it matted or not.   For larger sizes you can contact me and we can make arrangements to have one printed and shipped to you.  My collection of 4 x 6 art cow magnets are also listed there on my Etsy Shop and are priced at $6 each.  Cow Magnet Collection

I encourage you to spend sometime looking at my shop.  I regularly add new artwork there and am working to build a nice inventory of handmade gifts that feature my artwork.  To see more of my artwork you can hope over and check out my website gallery by selecting the "My Art Gallery" link above or clicking this link Julie Townsend Studio.

I would love to hear from you, so Go a head and leave me a comment below.