Showing posts with label Art Exhibit. Show all posts

Monday, October 22, 2018

My Art Show Booth Set-Up

I designed a new studio logo banner this week.  
Recently, I have been running here and there in the attempt to sell more of my original art.  Setting up my booth at different venues and every time I'm out there I get asked about where I got my grids or the lightweight tables I use to lay out my merchandise on.  So I thought I would share this information with you and provide specific links to make it easy for you.

I purchased most of my grids through Amazon and I have provided the link to that.  I decided to not to purchase the feet or stand to hold them up because I hate how they stick out and it is more work to set them up.  What we have discovered is that we clip 3 grids together using the grid clips (link and picture provided) then we zip tie the units of 3 together. They then fold flat into each other and they are about the max weight that my husband wants to handle at a time.  The caution here is that there is sometime shifting and your fingers can get pinched.  We are working on some designs for some clip on handles to help with this problem. 

Having them in 3 grid sections makes set up quick, easy and versatile, filling different space scenarios. They can bend to create a corner or overlap each other to accommodate smaller areas. Once you have created the booth structure the grids are pretty self supporting but we do have 1"x 2" boards that we have painted black that we can zip tie to the to bottom of the back and side walls to give even more support if needed.  Here are the links for the booth items themselves.  I have a total of 12 grids and may purchase 3 more down the road so that I have enough to completely surround my 10 x 10 tent with a front entry opening but for now, 12 are meeting my needs perfectly.

I use the grid hooks to hang my artwork from.  If it is a very windy day, I even will zip tie my artwork to the grids to prevent them from blowing off. 

ZIP TIES ARE YOUR ART SHOW FRIENDS (and the all important wire cutters are a tear down necessity).


Grid wall system
Grid clips
Grid system hooks


Another item that I get asked about all the time is my wonderful tables.  I can't think about one negative thing about these tables.  They are lightweight, convenient, easy to store and the adjustable heights make them oh so useful.  I have 2 sets of these to make a total of 4 tables.  I also used some black flat sheets and sewed my own fitted table covering for them so they actually look quite classy inside my booth.  Also because they are narrow in width, they don't take up too much floor space inside the booth. 

I also find them wonderful for outdoor drawing and painting.  Set up in an L-shape make the perfect plein air studio surface.  Here is the link to the tables.


Coleman camping table


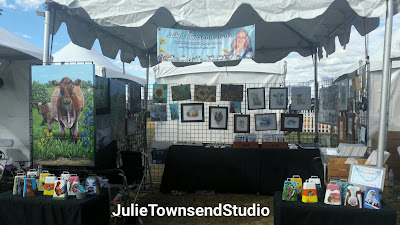
Outdoor festival set up with a tent provided by the event- Skye Canyon Chalkfest
Here is my booth set up last weekend at an outdoor festival measuring 10 x 10.  The tent was provided by the festival so it was  very sturdy.  You can see my grids do not quite completely go around the full 10 x 10 space and so down the road I might consider buying 3 more because I really like to have that 2 foot section in the front to serve as a doorway and here I only was able to do that on one side.   I try to position my larger, crowd drawing art piece in the front to pull people over to my booth.  The cowbells were also a good draw.

Before my next art show, I'm going to purchase about 4 or 5 flat black sheets to use as backdrops.  I think the art looks better when you can't see through the grids and there is a visual wall.  It also provides movable shade and can be used to cover your merchandise at night.  They will become just part of the accessories inside my art show box. 
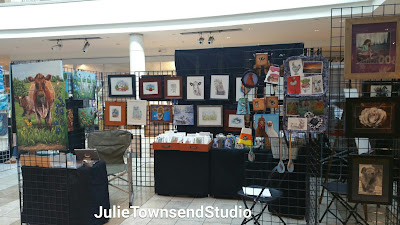
Recent booth set up at the Galleria Mall 
Here is an indoor booth set up that measures 10 x 6.  It is a much smaller space but holds almost the same amount of art as does the 10 x 10 space.  I even have one small table set up with my colored pencils so that I do live drawing during my time there.  It is quite comfortable and you can see how nicely my covered tables look inside my booth.

Wednesday, April 20, 2016

You're Invited!

Please consider coming if you find that you have some free time on Sunday.  I would love to talk to you about my artwork and this beautiful gallery.


This Sunday, April 24th is my closing reception at the Boulder City Art Gallery

Sunday, April 15, 2012

The rule of NO KISSING

This past weekend I subjected three of my works to the public scrutiny of the Clark County Fair and Rodeo in Logandale, Nevada. Now, I realize that a county fair isn't known for being a haven for renown art critics, but being that I am such a new artist, any opportunity for public display of my work is a learning experience.

 I had dreams that my newest piece, a large 24x36 inch acrylic painting that I call "Utah Reflections" would WOW the judges and I would arrive to find a number of large colorful ribbons prominently hanging all over the edges of its beautiful old barn wood frame. I was quickly brought to reality, when I saw only one single red ribbon fluttering in the slight breezes that blew off the 4H livestock barn.  Under that ribbon, was the judges score sheet and comments. Not wanting to draw attention to myself, I quickly scanned the words printed there. A paraphrase of the comment I found reads something like this, "Really good painting but your focal point is the bridge and you have placed in the corner."

To my untrained artistic mind, having the focal point in the corner was what I thought made the painting interesting. I also noticed, in most of my other works the focal point is off in the corner too.  Now, I realize that I am a self-taught artist and being that I haven't had intense composition training that many scholarly artists have undoubtedly received in the higher halls of art education and so I can confess I really know nothing about the official rules of composition.  Even so, I still think I have a natural eye for design, so I thought I would do a quick study on the subject.

A quick Google search and I found plenty hits on the subject but found the article written by Marion Buddy-Evans called "Art Composition Rules" at www.about.com, proved to be pretty informational and condensed enough for my purpose of a really quick study.  There are several of the rules I know I now remember my high school art teacher, Mr. Easton telling us about.  One was the "Rule of Odds".  I always arrange things with odd numbers because Mr. Easton told us that made for a more interesting composition.  I didn't consider the why to that reasoning, but the article says it is because our brains can't pair things up on the composition and therefore it keeps our eyes moving across the canvas.  Well, I guess I'm good with this rule since my compositions has only ONE bridge.

I also found out about the "Rule of No Fried Eggs".  This rule is broken when you place your focal point right in the middle of the canvas surrounded by bland background.  Since my bridge is off the to far right corner, I'm assuming I didn't break this rule either and of course there is no bland background in any of my paintings.

There also is a "Rule of No Kissing".  This rule is broken when you allow edges of the objects to touch and not overlap or leave spaces between them.  The example was giving in the article of the horizon edge touching the edge of the sun rather than overlapping it.  There is depth and interest giving when objects overlap.  I think I'm good with this rule.

I think it is the "Rule of Thirds" that pertains more directly with my pieces and the placing of the focal point.  In this rule you divide the canvas space into thirds both vertically and horizontally.  The four intersecting points are hotspots and should be considered when you are placing focal point.  Rather than smack dab in the middle, or in my case the far bottom corner, your composition is suppose to be more interesting if you place it one third up or down or one third left or right. 

I know that all rules are there as guidelines and can easily be ignored, but I think it is important for me to consider these rule each time I rip open another canvas.  Rather than just painting and hoping for a great end result, a little more planning might be just the thing.  In reality, I only had one photo of that bridge to work with and I was really struggling with the perspective of the right side of the bridge and that is why I decided to simply paint the bridge right off the canvas.  As the artist, I have the creative license to do that.  The lesson here for me is that when I find an interesting subject matter, I need to take multiple shots, at all different angles so that I have the liberty to paint the focal point anywhere I want. What is really important here is that I learned something this weekend and that I'm still pleased with my piece even if there is only a single red ribbon hanging there.