
You would think that somehow along this journey to becoming an artist, I would have learned how to properly maintain my brushes, but I guess not. I only remember in high school art class washing my brushes in the sink under running water and doing that only until the water ran clear. I thought that was all there was when it came to brush care....(I will continue this blog as soon as you have stopped laughing.)
I became suspiciously aware of the fact that there just be a bit more to paint brush care when I started taking formal painting lessons. Each week, I would arrive to Lily's house to have sitting before me my unfinished painting, a clean palette with little colorful blobs of oil paint and 5 or 6 paint brushes that all had bristles that were well rounded, a sharp point or had a nice sharp edges. The bristles were stiff and a frankly a joy to paint with. I know that a number of my brushes are very old but I have found that when I buy brand new brushes, that before you know it, the edges of the bristles are spread apart and I no longer am able to paint a nice straight detailed line. Even after trying to shape the edges, while the bristles were wet and allowing them to dry on a flat surface I would still have brushes that were far from what Lily had. So a couple of weeks ago I decided to swallow my pride and ask Lily for help.
The paint brush exorcism took place yesterday at the end of my painting lesson when I painfully submitted my brushes to Lily's scrutiny. During my 2 hour lesson, my brushes soaked in cleaning solution suspended by a wire hanger. Just before I was to leave, Lily and I went to her kitchen sink where she pulled out a tub of brush cleaning soap and began to squeezing the bristles and rubbing the brushes vigorously in the palm of her hand.
To my horror, old paint that had worked its way into the ferrule of my brush began to turn the white soap lather into a nasty green-gray color. I think I heard Lily mutter something under her breath about never having seen such dirty brushes.
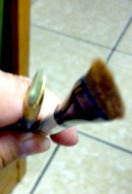 |
| Yes...that is suppose to be a 3/8 Angle Shader on the right that I apparently have ruined in comparison to a #6 angle brush that with my new gained knowledge won't ruin. |
So here is what I learned about brush care:
1. If the brushes are really dirty you will need to soak them in a brush cleaner solution perhaps as long as overnight. I definitely think that describes my current situation. You want to us a brush washer that allows you to suspend your brushes in the solution without covering the ferrule of your brush.


2. Use a brush soap and get the bristles well lathered. Rub the bristles vigorously in the palm of your hand then squeeze the bristles between your finger and thumb nail to work the old paint out from deep within the base of the bristles and the ferrule. Repeat until your soap lather is white. Leave some lather on your bristles to work as a sizing to allow you to form the desired shape with your fingers.

3. Lay the brush flat on a paper towel to allow to dry. Don't stand them up on the end of the handles as the water will stay in the ferrule and will eventually cause damage to your paint brush handle.
Now is when the fun really begins. I am off to the store to purchase the necessary items and then I will begin the long process of trying to save my brushes by soaking and soaping them back to life. As you can see, I have my work cut out for me.

No comments:
Post a Comment