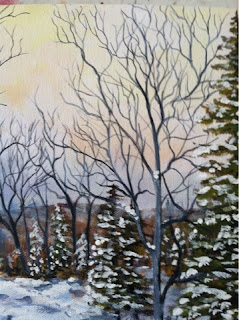
Showing posts with label Lily Adamczyk. Show all posts

Thursday, September 24, 2015

What....You Want Me To Talk About My ART?


I had no idea that the month of August is considered American Artist Appreciation Month but I do now.
This week, at the invite of artist Patience Brewster I decided to participate in a fun self interview.  Her goal is to get as many artists bloggers as she can involved and answer questions about their own work and motivations.  I thought about it for a few minutes and I came to the conclusion that  I love to Blog, I love Art and I love to Blog about MY ART, so I'M IN!

Of course the first thing I did was research Ms. Brewster and found a well organized website full of beautiful artwork on cards and ornaments.   Her work is whimsical and fun and I was immediately a fan.  Check out the ornaments of Patience Brewster yourself.

Here are the questions she asked of me:

1. As a child, do you recall a significant moment when you felt truly affected or inspired by any particular artwork or artist?

I can't recall a specific moment but rather my earliest memories are of me spending hours sewing, drawing and coloring.  I grew up rather poor in the hills of the Missouri Ozarks.  As a matter of fact, most of my childhood we lived in a 12' x 50' single wide mobile home that barely fit the 5 of us crammed like sardines in a can.  Barely one square inch of free wall space could be found to expose the shabby wood paneling behind all the piles.   I think my parents were more concerned about keeping food on the table then making sure we had exposure to art and culture.  That was pretty much non-existent until I got into high school. 

 I think it was this lack of beauty that drove me to my solace in art because even as a young child I tried to fill my world with color.  Since we couldn't afford all the the pretty room decorations and fancy school supplies I took to making my own.  I painted my school folders with acrylic paints, created my own stationary using watercolors and cut out giant flowers to decorate my little corner of the bedroom I shared with my younger brother and sister.  

2. As an artist, what do you hope to convey with your work?

 When I returned to painting a few years ago my goal was just to improve my skills and learn as much as I could about color and composition.  I certainly don't have some social agenda or a hidden message that I'm trying to convey with my work but rather just create beautiful images that others love to look at as much as I loved creating them.  I get confirmation of that each time I make a sale.  

3. What memorable responses have you had to your work?  

Some art highlights that stand out in my mind would be being featured in an article in "Gold Prospector" magazine.  I remember the week that the article came out and I had actually forgotten about it, but I had a complete stranger come up to me as I was displaying my artwork in front of Wholefoods in Henderson, Nevada and asked if I was that artist that was in his magazine.  He wished he had his copy with him so that he could get my autograph!  That made my day for sure.  

Also winning "Visitors Choice Award" is always a great honor.  It is sometimes difficult to understand the criteria that some judges use when placing awards at art shows but to have the majority if visitors at a show or that come through a gallery prefer your piece of all others is very much and honor.  I would love to hang a Best of Show ribbon among my awards someday but until then my visitor choice ribbons are very special to me.  

4. What is your dream project?

I would probably answer this question more correctly by changing the word project to goals because my focus isn't on one specific project as it is on long-term art goals.  Some of my dream goals I have would include designing artwork for  a company like "Leaning Tree" cards or to have my artwork hanging in a gallery in Jackson Hole, Wyoming.  Both of these goals would be confirmation to me that my art has reached a level in a venue that I have always greatly admired.  

5. What artists, of any medium, do you admire? (Famous or not!)

I have always admired the work of Robert Duncan and I had the great pleasure of visiting his gallery last summer when his original paintings were on display.  The colors were more vibrant that I could have imagined and his ability to capture the joy of simple country life reminds me of my own simple childhood growing up in the Ozark hills.  His art moves me!

Tim Gagnon is really who I credit as the influence that got me to pick up my brushes 4 years ago and now a couple hundred paintings later I'm still going strong.  His 12 week basic landscape course helped give me the confidence I needed to start painting after a 30 year life break.

My husband's cousin is a successful artist from Powell, Wyoming.  Mike Kopriva is a nice guy and a great artist. That is a winning combination and what a perk that we are actually related!

From the first time I saw the work of local Las Vegas artist, Lily Adamczyk I knew I wanted to get to know her better.   Her landscaping paintings are amazing and I felt that I could learn a great deal from her about art and the business of art from her.   I'm so blessed to call her my friend.  Her critique of my work has probably been the single greatest factor in my skill improvement over the past several years as an artist.  She doesn't hesitate to point out what I could do to improve my technique or composition.  I've learned so much from her as an artist and a friend.


Friday, May 2, 2014

Learning to Paint Sea Foam

"The Little Shell Seekers"  18 x 24 Acrylic

About a month ago I was extended an invitation to paint along with a dozen or so other very talented local artists at the Springs Preserve on May 10th as part of their O'Hana Festival event.  My friend Jeffrey Oldham just through out there that I should gather up all my pieces that were tropical or ocean themed to bring along.  Did I ever mention that I'm originally from Missouri and have lived in the Nevada desert for over 35 years.  Oceans are something I just don't understand and have stayed away from so far....

Well this past couple of weeks I've pulled out all the different shades of blues greens that are in my acrylic paint drawer and bravely began painting in uncharted territories or water to be more accurate.  

I flipped through my photo inspiration file and settled on this amazing photo taken by a fellow artist and my Facebook friend of her precious granddaughters picking up shells.  As always, when considering using photos taken by others, I obtained permission to use the photo before I began painting.  Holly Kallie has so much artistic talent and only has to step out her front door to view amazing sunsets and frozen winter lake scenes.  Her granddaughters are so cute and provide endless adorable painting materials.  Holly actually painted this exact same scene and released it this week also.  It is so much fun to see how two artist handle the same subject.   Check out Holly's artwork at  Holly Kallie 

  
Reference Photo taken by artist Holly Kallie

My first attempt at the composition can be seen with this work in progress shot.  I tried to show each wave and catch the water reflections but knew I was falling short.  I viewed numerous videos on YouTube trying to understand the nature of painting of waves.  So I asked for a bit of help and from my artist friend and mentor, Lily Adamczyk.  Lily has amazing talent and proficient at all types of landscapes but one thing that she is well known for is her ability to paint beautiful ocean scenes.


Work in Progress


To achieve the final result, I had to smooth out the ocean so the girl's dresses stand out better against the background.  Lily also gave me instruction on the proper technique to paint realistic sea foam.  I finished off the detail on the dresses and reduced the size of the sun hat.  I'm really pleased with the end results and am excited to bring this piece with me next weekend along with a few other "Tropical" pieces I've managed to finish during this past month.  This piece will be displayed on May 10th at the Springs preserve and will be available in the next few days on my website at Julie Townsend Studio (You can click the link above also) and you can follow the link to order prints or view my other works if you are interested.


Monday, June 3, 2013

Sometimes Life is Pretty Black and White

but I have a tendency to use both colors way too much when it comes to painting.  I have been trying to learn more about color and so I'm really studying the book titled "Color Harmony" by Margaret Kessler.  Ms. Kessler addresses the use of white and black on page 15 where is says that, "If you lighten a color, you reduce its intensity. But, if you do this with tubed white (a cool color) without modifying it with hints of warm color, the result looks chalky" and regarding the use of black or paynes gray to darken a color, Ms Kessler cautions that the result may look boring or unnatural.

Now I do know this and yet this head knowledge sometimes escapes me when I'm in the "Zone" and I'm thoughtlessly dipping my brush too often in both the white and paynes gray.  Repeat after me....Highlights from the sunlight are not really white and shadows cast are not really black or paynes gray.  That is just my lack of understanding of color and letting my preconceived idea of how things appear rather than real observations.

A good example is that of a recent painting I did that I'm calling "Feisty Fowls".  I took the piece to my painting lesson with my friend Lily Adamczyk for a critique and as usual there were a number of corrections that needed to be made and just like homework I took the time to make the suggested changes.

Here is the BEFORE:


Corrections made:
  1.  removed the darkness from their faces. I had used paynes gray...BAD! BAD! BAD! I used burnt sienna and dioxadine purple mixed with the red to give the darker tones to their faces
2.  removed the white...BAD! BAD! BAD! on the edges of the combs and used orange as the highlight instead
3.  brightened the grass with a glazing of thinned yellow green
4.  removed the intersection of the background hills that put the second rooster in the cross hares or bulls-eye.
5.  brightened the stones and squared them up to give them more of the appearance of a stacked stone wall

AFTER:


Tuesday, April 16, 2013

Everyone Needs a Critic

I have one friend that I can depend on that will always tell me the truth about my artist endeavors. She will always tell me what she likes about my creation but equally she doesn't hold back with truthful criticism and since she has nearly 40 years of painting experience, I know that she knows what she is talking about. Sometimes it is hard to hear but it is EXACTLY what I need if I want to grow as an artist.

Right now, my week has been consumed with working on my very first commission piece and last night my friend had a great deal of sound advice regarding my progress. The issue with this commission piece is that the buyer has requested a combination of two of my existing paintings on one canvas. Both of these pieces were featured in the Mar/April 2013 edition of "Gold Prospectors Magazine". Now with many paintings that might not be a problem per say but in this case we are talking about two completely different landscapes; one is of a mining shack that I painted near Tonopah, Nevada and is smack dab in the heart of the Mojave Desert and the other one is of a prospector panning for gold in a mountain stream. The focus of both is gold mining but blending the two together is proving difficult.

I had followed her previous council and had created a rendering by doing a pencil sketch of the layout based upon the conversation I had with the buyer. The buyer said he loved the idea and so I proceeded to start my painting. Visually, I worked to combine the sky and mountains between the two scenes and then my plan was to separate the two scenes by using tall pines trees and shrub pine in the center as a division. When I was about 3/4 of the way complete, I sent a progress picture to my friend and she had a great deal to say about it.

First, she told me that it was breaking a huge compositional rule by having large trees in the center of my canvas and that these trees are the focal point when they shouldn't be. No matter if the buyer agreed, it was my job as the artist to direct him to a composition that works and while they may be buying the piece upon completion, I still owned this work. They will probably be in awe at anything you paint because they don't possess the artistic skill to paint anything and that is why they hired me. She didn't want me putting something out there that I might later regret. All I can say about this is that I sure have a lot to learn about this art business.

Then she gave me some helpful advise to consider a correction. She advised me to take a heavy bristol paper and to tape it on to the canvas in the problem area. Then re-paint the scene that better brings the two paintings together and that will minimize the center pine trees. This way I can visually see the correction before I start laying waste to my piece and deciding this wasn't going to work. Wise advice to be sure.

I have included the pictures of my original works and the current piece in progression so that you as the reader might learn along with me. After all, the purpose of this blog is to hopefully help other aspiring artists like myself by sharing my journey.


Thursday, April 11, 2013

NetWORKing is a lot Like WORK

I think every successful artist will tell you that at the beginning of your journey you have to work hard networking. Networking with other artists, potential customers and collectors. I would wager that almost all successful artists will tell  you a number of stories that include their days working the art show circuit.

So this past weekend I did my duty by sitting in a booth covered with my beloved artwork and surrounded by my artist friends. I didn't sell anything but then neither did many other very talented artists so I'm not discouraged. As a matter of fact, this month I have made the investment in grid display panels so that I could professionally display my artwork at future shows. I just have to remember that perhaps one of those many business cards I pass out and every conversation I have about places in Nevada that have inspired me to paint will someday result in a possible sale.

This economy makes it very difficult to sell your work and it is nearly impossible if you are only sitting in your studio at home. It takes constant work keeping yourself in the public eye by showing your work on the internet, in co-op galleries and yes, even at art shows. So today get up and talk to someone about your art and don't forget to pass out your business card.

Artists Jan Arduini, Lily Adamczyk and myself

Thursday, March 28, 2013

What Moves You?

I would love to hear about an experience that you had when a piece of art "MOVED" you and stirred an emotion within your soul.  Where were you and do you remember the details of the piece or the artist's information?

I was reading through my Facebook updates this morning and had to read an entry by fellow artist (I love saying that) Elizabeth Robbins.  She stated, "This is why I paint. My soul touches another through my paintings."  She went on to share a letter that she had received from a collector that had just purchased one of her paintings and had relayed the emotional response that the collector's husband had when he saw the painting for the first time.  

Moving the viewer is what art is all about.  My goal with each piece should be to transfer the emotion that I felt when I was taking that hike, viewing the sunrise or witnessing the color splash of a blooming cactus against a rugged landscape to the viewer.  Now not everyone is going to be impacted the same by my art.  Often there will be a memory stirred of a place visited or a special childhood remembrance brought to mind and we don't all share the same memories or emotions.    A piece of art isn't just a wall decoration that is purchased because of the current color of your sofa.  Real art should be something that makes a connection to the viewer.  You want that person to love looking at your piece everyday and never grow tired.  I of course am not implying that my work has reached that level yet but as a landscape artist that is a level I'm trying to attain.  My work may never hang in a famous gallery or be invited to show internationally like some artists enjoy, but someday I too hope to have collectors of my art and people bringing me photos of some favorite vacation memory to commission a piece for them to cherish and pass on to their children.  


As my mission statement declares, "I want to leave little pieces of my heart framed and hanging on a wall for everyone see it, appreciate it and remember me by."  If your interested in seeing my work, be sure and check out my website and gallery at julietownsendstudio.com.


Here is the latest piece I have completed during my lessons with landscape artist, Lily Adamczyk.  This piece MOVES me and I hope that it has that same impact on you.   My goal with taking lessons is that I will be able to paint with such proficiency and color accuracy on my own without Lily looking over my shoulder.  I just want to be a sponge and  soak up the 40 years of her experience in each two hour session, but that takes time and LOTS of practice. Oh and LOTS of LESSONS!


Friday, March 22, 2013

Make Your Colors POP

"The road to color harmony begins with understanding the characteristics and properties of the colors on your palette-how to mix and match them so that they work for you.  You must appreciate the full potential of every color and the effect each color has on another." Margaret Kessler

I've had the book called "Color Harmony in Your Paintings" by Margaret Kessler for sometime and I know that when I first received it I flipped through the pages but up to this point I haven't really studied it.  Today I am reading through it's pages and am anticipating the information that I am going to glean from within it's covers.

I find myself underlining several great points on page 15 that deal with the topic of Intensity.  Kessler says, "The key to making your paintings 'pop' is to juxtapose bright hues against dull ones."  I think that I'm going to write this down on a note card and post it on my easel because even though during my painting lessons this has been discussed, I find that in the heat of painting these important foundational points can be neglected.  You really want an object to "POP" you need to paint the lighter values next to a darker color.  Leaves in a tree are a great example.  As you increasingly lighten the value of your leaf color you want to position the brightest leaves in areas that are surrounded by darkness.  I did this in my painting "Fallen" and the birch saplings seem to almost jump off the canvas. Lily also had me place light colors for rocks in the shadows and dark colors for the rocks in the sunlit areas.

Painting completed during my painting lessons with teacher Lily Adamczyk


Last Leaf
This concept again was used in my painting Last Leaf.  The darkness of the pine needles cause the light gold tones in the leaf to just pop off the canvas. 


Monday, March 11, 2013

How Much Paint Is Under Your Fingernails?

If you are interested in viewing more of my work then please check out my gallery page on my website at : JulieTownsendStudio.com

I had a phone conversation the other week with Pastor Tom Van Kempen, my pastor, my former boss and yes friend.  He was just checking on me since my Dec 2012 retirement after 27 years as the business administrator of The Champion Center of Las Vegas.  He just wanted to call to see how I was doing.  During the course of our conversation he verbalized a statement that I hadn't completely considered, but in my heart I knew was true.  He said, "You are creating a whole new life for yourself."   Wow, this really is what I am doing.  I know for one thing, I didn't leave the workforce so that I could stay at home and watch TV and piddle around the house...No, I have stayed focused and motivated these past three months to paint better and have set goals and increased my networking.
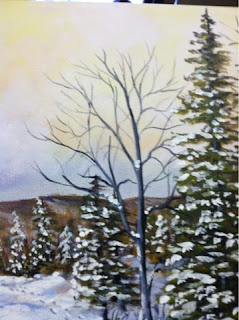
As of January 2013, I'm now represented by a small co-op gallery in the heart of the Las Vegas art district.  I was also ecstatic to have the March/April publication of Gold Prospectors magazine feature a story about my love of painting Nevada.  This is all thrilling but probably my biggest change has been the addition of artist friends in my life.  While my life has been blessed with 3 very dear friends to share my joy, pain and all the other emotions that life might throw my way, I didn't have friends that shared the love of art.  So two years ago I joined the local artist guild and set my sights on becoming acquainted with a couple of veteran artists that had not only experience in the art world but might also help me develop or improve my style.  This decision has probably been the most important of all to my journey to become an artist.

Just this past month,  three of us decided to challenge ourselves by painting the same landscape photo.  There was no real purpose except to challenge each other and the fun of seeing how each of us would handle differently the same subject.  Yesterday, I got to see the Jan Arduini's finished product. I love the fact that I am part of this little inner group.  I'm still waiting to see how my friend and instructor, Lily Adamczyk handles the challenge as she hasn't finished her piece.  I couldn't help but reflect this morning over my morning McDonald's coffee on Jan's painting and my own.  I decided that I would share both works with you and hopefully encourage you to get yourself out there as an artist and start rub shoulders with others that just may have more paint stains under their nails then you do.


Original Photo provided for the challenge


This is my rendition- I'm calling it "Standing on the Solid Rock"


Jan Ardiuni's version


Almost completed work by Lily Adamczyk

Tuesday, March 5, 2013

Painting in My Daddy's Studio

IF YOUR INTERESTED IN SEEING MORE OF MY ART THEN PLEASE CONSIDER CHECKING OUT MY GALLERY PAGE ON MY WEBSITE AT:  JulieTownsendStudio.com

This weekend I took my little art show on the road. I'm under the belief that the majority of artists have to spend the time hocking their wares and braving the elements before attaining a certain level that allows them the freedom to just pack up their creations, ship them off to prestigious galleries and let well dressed sales staff do their bidding. So from the bottom levels of small parking lot art venue, I have spent my past weekend being cooked like a lobster in the hot Nevada sun on Saturday and then to have my artwork blown around like neglected laundry on the clothesline on Sunday.

Today, I sit here drinking my McDonalds coffee still feeling the effects of the weekend on my sunburned and windburned cheeks.  All this in the name of marketing my art. I can't believe how a little fresh air can make one feel so exhausted.

The exhaustion subsides slightly however, when I remember my art excursion yesterday. Dragging myself out of bed was the biggest challenge, but once I had my feet firmly planted on the floor I then turned my attention to packing my art bag and a yummy picnic lunch.  You see,  plans had already been set in motion to meet my artist friend and teacher, Lily Adamczyk for my second plein air experience.(Painting outdoors)

There is just something about sitting in view of a magnificent panoramic vista that makes me consider the greatest artist of all, my Heavenly Father and this amazing masterpiece He created for me to enjoy. When viewing the mountain range that stretches before me in preparation to start my painting, I look at my palette of available colors that I have just squeezed out and my mind considers just how to combine them to come up with the blue of the sky, the reds and golds in the rocks and the amount of green versus browns in the foreground. Is that more alizarin crimson or would I use more dioxazine purple to match that dark strip that runs throughout the full distance of the cliffs? Is the sky more ultramarine blue or do I need more of the cerulean?

Three hours just pass by as I hurriedly try to capture the scene on my canvas before the sun completely changes. I only stopped for a few minutes to eat the lunch I had packed with such thought and care earlier that morning. No longer was the priority in my mind the roast chicken, fresh fruit and edamame salad that I had placed in my cooler, but rather my unfinished canvas and the dream of what my finished piece will look like.

If you haven't painted outside of the confines of 4 walls and artificial lighting for sometime, then consider, as we approach this spring season, to pack up your paints and brushes and go paint in OUR DADDY'S STUDIO.

Beautiful Red Rock Canyon just outside of Las Vegas


Lily working on her second plein air piece


My second plein air attempt...not where I want it to be, but certainly improved from my first trip


Friday, February 8, 2013

Who Knew Talking About Landscapes Could Be So DEEP

When I took my first painting lesson back in July 2012 with instructor and friend, Lily Adamczyk the concept of creating depth in your landscape was stressed from day one.  Prior to taking lessons, I would work on my backgrounds by adding almost as much details as I did with the foreground. 


This earlier piece I called "Nevada Dreams" lacks that distance and transition from foreground to background that I am now learning is so important.  I still like elements in this piece, but now I'm learning there are several things that I should have done to make this composition better.  I now know that I should split my canvas in 1/3's rather than making this 1/2 sky and 1/2 landscape.  I also believe I could have better accomplished the impression of distance if I had made the mountains end  at either 1/3 or 2/3's of the canvas and give the impression of a distant range far in the horizon.  After all, Nevada has more mountain ranges than any other state so there are always mountains in the distance no matter where you look.  I will one day revisit this shack located east of Tonopah and give it another go around.
Nevada Dreams- 24 x 36 acrylic painting
This next painting that I call "Fallen" was completed as I took my first lessons with my accomplished instructor.  It clearly gives the impression that the forest path continues.  Your eye is drawn there because you can see the impression of trees and sunlight in the distance.  You know that your hike isn't finished but rather this is only a stopping point as you ponder this giant of the forest that fallen.  Good landscapes must engage the viewer, causing them to stop and consider the whole canvas.  A simple glance would never do.   So I have tried to remember that lesson with each of my painting since then.

Fallen- 16 x 20 Oil painting- See how the forest trail continues on further giving this painting depth


Newest acrylic called "Galena Creek Birches"-  again I have continued the trail on into the forest drawing your eyes up the hill.  For a better picture you should check out my website at JulieTownsendStudio.com


Saturday, February 2, 2013

There is a BUG Stuck in My Paint

I have been reading a book by Kevin Macpherson called "Fill Your Oil Paintings with Light and Color".  Mr. Macpherson is an accomplished En Plein Air painter.  (That is French for "In the Open Air")  This is an excellent book and I'm learning a lot about color, light and shadows from it's pages.

From someone who is a "Studio" artist, painting outside has a unique set of challenges as I experienced yesterday.  This style of painting is definitely something I want to learn and so I was very excited when my friend Lily asked me to accompany her along with few other artists with the Nevada Plein Air Group to Hemmenway Harbor at Lake Mead to spend a few hours painting in the fresh air.

I actually did learn a number of things and am anxious to improve my "En Plein Air" techniques.  The real truth is that yesterday I was basically pretending to paint and Lily is the real McCoy!  While she didn't finish her little 10 x 20 piece, she got a good portion of her painting completed and I was dually impressed. I spent a great deal of the time watching her ability to paint quickly so she could  catch the essence of the moment, not worrying about exact detail but rather reflection, light, color and shadows all come together so that she could catch the emotion rather than the exact image.

So different from painting on my beautiful new easel with all my supplies surrounding me and listening to either Willy Nelson or my new piano praise CD.  This will definitely take practice on my part but I'm anxious for the challenge of bugs stuck in wet paint, working in big floppy straw hats, dirt in my teeth and the sun in my eyes.


Monday, January 28, 2013

Let Gravity Be Your Painting Friend

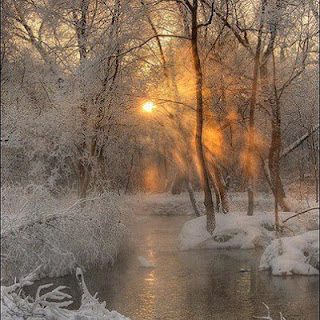
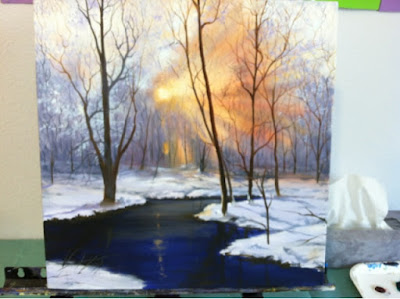
Last week I went to my painting lesson as usual.  I'm currently working on a winter scene that contains a number of bare trees.  I am actually painting from a reference photograph that taken by a fellow artists and Facebook friend, Clive Hughes.  I fell in love with the reflection and the bright sun rays and graciously he granted me permission to use his photo.

Reference Photo taken by Irish artist, Clive Hughes


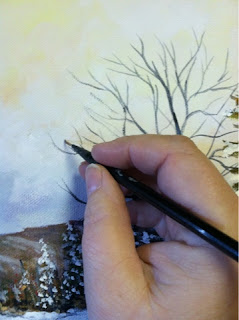
I am in the place in my painting where I need to add the small fine branches for the background, so I grabbed the small script brush and started to paint away.  I had only made a few lines when I heard my painting instructor, Lily Adamczyk give a loud statement about the way I was holding my brush the wrong way.  My painting lessons are often a humbling learning process because it seems almost every lesson brings to light something that I am not doing correctly.

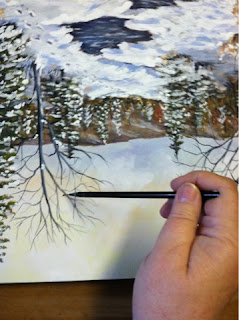
I was holding my brush more as you would a pen.  Far down on the handle near the bristles.  According to Lily, I need to hold my brushes more to the end of the handle so that I can allow for a more freedom of movement, letting the paint actually do the work.  The result will be a more natural looking branch because small branch detail should not be rigid or uniform.  Another helpful technique is to actually paint the small branches with the canvas turned upside down.  This allows gravity to actually assist you with the loose, free movement that you need to make realistic branches.
Current state of my WIP painting that I am doing from the above reference photo at my painting lesson


To reinforce what I have learned I had the perfect picture to come home and work on because there was actually painting a woodland snow scene full of bare trees that is a WIP on my easel.

A portion of my WIP painting that shows the lack of fine branch detail


Holding my brush the WRONG way!


Example of the correct way to hold the brush to get the loose fluid movement needed for the fine branch detail.  The canvas flipped upside down can also be a helpful technique.  This allows gravity to help your brush movement.


Additional small branches add to fill in the tree using the technique that Lily taught me

Wednesday, January 2, 2013

2013 Starting Out To Be A Busy One

I'm make preparations to hang my artwork on Thursday at the City of the World Gallery.  Lots of little details to get ready but I'm SO excited to see everything framed and hung. 

My new oil paintings all have to be varnished.  I thought that you had to wait about 6 months before applying a coat of varnish to seal the piece but once again I have learned something new from my friend, instructor and accomplished artist, Lily Adamczyk.  She uses a varnish called Gamar made by Gamblin that is sold at Blicks Art Supply.  Making a trip there first thing in the morning.  I was also able to purchase a few more frames at Hobby Lobby and of course that was at their 50% off weekly special.  YES!

Thanks to my son, I've got my new business cards just in the nick of time. I've been updating my website and blog so they look all pretty. Now maybe tomorrow I can actually start another painting...MAYBE!


Monday, October 29, 2012

Watch Grass Grow

I have blogged a number of times about my painting lessons that I am taking with a very talented local artist by the name of Lily Adamczyk.  If you have followed any of my former blog posts you know that I have been painting only for the past 2 years and have been using acrylics up to this point.  Taking lessons from an accomplished artist and learning a new medium like oils can open one up to a new level of critiquing that facebook friends or family dare not provide.  In their defense 1. they probably don't want to hurt my feelings and 2. even with all my bad habits I demonstrate a level of skill they may not have themselves.  

I chose for the subject of my first solo oil painting a field with three longhorns.  Well, actually two longhorns and a calf.  We took this photo somewhere along the road while traveling in Nebraska.  I loved the look these bovine gave us as we forced my 14 year old niece to stand in a field of corn so that we could take her picture. You don't come across too many fields of corn in the Nevada desert so we made her pose all across the countries bread basket states.  Actually, now that I think about it, I haven't seen too many longhorns in Las Vegas either.  Regardless of what crazy things we were doing to make them stare at us like this, I loved this photo and knew immediately that I wanted to try and paint it.


So as I began painting out my scene on the blank canvas, I couldn't really get around the fact that my subject was surrounded by a great deal of green grass.  I decided to split that up with a small stream running across and to have a distant barn on the horizon.  As I posted this painting on facebook, I received a number of compliments about the way I painted my grass.  So, I proudly carried my partially completed work to my most recent painting lesson so that Lily could get a close up look at my masterpiece.  I was sure the she would like the way I handled the long grass in this composition because I tried to follow her instructions on the painting I had done previously that I call "Memories of the Road Home".  Boy was I WRONG!!! 


Lily's first comment to me was that she see me making this mistake all the time and she is going to break me of my bad habits, especially when it comes to painting grass and having things springing up from the edges of my canvas.  I guess that meant that she didn't like the tree I added in the corner.

The first correction she had me do was to add more contrast to the grass areas by adding brown squiggly lines in different directions. After these are completed, I'm going to come back in with a light ochre to simulate the grass that has gone to seed in my photo.


With this close up, you can see that I have started adding the contrast to the grass and have worked to DEFINE the BOVINE by darkening the shadows and highlighting the areas that are being impacted by the sunlight.  I can honestly say that this action has resulted in a marked improvement.  Lily is always right.

This is close up of an area that I have not yet added the contrast and I can see what a difference this makes in the overall feeling of the grass.  

I was thinking about the fact that for so many year I have not viewed nature with "ARTIST EYES" and now I am trying to interrupt what my memory remembers it to look like.  The randomness and imprefections that exists in nature is missing from my pieces because I'm trying to interrupt it and not really obeserve it.  What I really need to do to improve my paintings, is get outside and literally "WATCH GRASS GROW".

Nosey Girls- 18 x 24 (Oil)

Sunday, September 23, 2012

Back to the basics-WAY BACK!

This blog is somewhat of an embarrassing blog to write because it requires that I make a very personal confession, "I have dirty brushes."  Okay, there I have said it for the world to read and so now I can move forward towards my recovery.

You would think that somehow along this journey to becoming an artist, I would have learned how to properly maintain my brushes, but I guess not. I only remember in high school art class washing my brushes in the sink under running water and doing that only until the water ran clear.  I thought that was all there was when it came to brush care....(I will continue this blog as soon as you have stopped laughing.)

I became suspiciously aware of the fact that there just be a bit more to paint brush care when I started taking formal painting lessons.  Each week, I would arrive to Lily's house to have sitting before me my unfinished painting, a clean palette with little colorful blobs of oil paint and 5 or 6 paint brushes that all had bristles that were well rounded, a sharp point or had a nice sharp edges.   The bristles were stiff and a frankly a joy to paint with. I know that a number of my brushes are very old but I have found that when I buy brand new brushes, that before you know it, the edges of the bristles are spread apart and I no longer am able to paint a nice straight detailed line.  Even after trying to shape the edges, while the bristles were wet and allowing them to dry on a flat surface I would still have brushes that were far from what Lily had.  So a couple of weeks ago I decided to swallow my pride and ask Lily for help.
 
The paint brush exorcism took place yesterday at the end of my painting lesson when I painfully submitted my brushes to Lily's scrutiny.  During my 2 hour lesson, my brushes soaked in cleaning solution suspended by a wire hanger.  Just before I was to leave, Lily and I went to her kitchen sink where she pulled out a tub of brush cleaning soap and began to squeezing the bristles and rubbing the brushes vigorously in the palm of her hand.

To my horror, old paint that had worked its way into the ferrule of my brush began to turn the white soap lather into a nasty green-gray color.  I think I heard Lily mutter something under her breath about never having seen such dirty brushes. 
Yes...that is suppose to be a 3/8 Angle Shader on the right that I apparently have ruined in comparison to a #6 angle brush that with my new gained knowledge won't ruin.


So here is what I learned about brush care:
     1.  If the brushes are really dirty you will need to soak them in a brush cleaner solution perhaps as long as overnight.  I definitely think that describes my current situation.  You want to us a brush washer that allows you to suspend your brushes in the solution without covering the ferrule of your brush.


2.  Use a brush soap and get the bristles well lathered.  Rub the bristles vigorously in the palm of your hand then squeeze the bristles between your finger and thumb nail to work the old paint out from deep within the base of the bristles and the ferrule.  Repeat until your soap lather is white.  Leave some lather on your bristles to work as a sizing to allow you to form the desired shape with your fingers.


3.  Lay the brush flat on a paper towel to allow to dry.  Don't stand them up on the end of the handles as the water will stay in the ferrule and will eventually cause damage to your paint brush handle.

 Now is when the fun really begins.  I am off to the store to purchase the necessary items and then I will begin the long process of trying to save my brushes by soaking and soaping them back to life.  As you can see, I have my work cut out for me.

Sunday, September 2, 2012

No Pain-No Gain

Yesterday, was my scheduled 4th painting lesson.  I was anxious to progress on the current oil painting that I am working on of a fallen tree up on Mt. Charleston.  The difficult thing for me when it comes to taking these lessons is that I feel insecure because (1.)  I'm painting in oils and (2.) my natural approach to the subject is very different from that of my instructor.  Each step of the way she gives me instructions on the next process in the piece and often I don't produce the result that she is wanting.  Either I am trying to be too detailed, over doing it or not doing enough.  This can be frustrating, but as I have stated many times, I am self-taught and obviously in many aspects, self-taught incorrectly.  Bad habits can be hard to rid oneself of if they are deeply ingrained and apparently my bad habits have very "deep tap roots".

I was excited to take along my most recent painting that I call, "Memories of the Road Home" and one of which I have been very happy with. As I painted this one, I had tried to remember the points I have learned in the book I am reading by Margaret Kessler entitled, "Painting Better Landscapes" and the things I have learned so far in my 3 previous painting lessons that I have taken with Lily Adamczyk and all in all I thought I had done a pretty good job.  Boy was I mistaken!
This is my original painting that I had completed that I am calling, "A Memory of the Road Home".
I was sure that Lily would discuss a few things that I could improve on to make it a better landscape painting.  After all, there could only be a few minor changes that I could do to improve it because the overall piece was done well, or at least that was what I thought.  It was the last few minutes of my lesson when Lily suggested that we take a look at what I had brought along.  She picked the canvas up and in a matter of 30 seconds or so she said..."Do you mind if I...." and she grabbed a roll of masking tape in her other other and began placing pieces of tape in different directions on the surface of my canvas.

Lily said that when you are painting buildings it is very important that you emphasize angles and lines and the best way to insure that they are straight is by using masking tape.  As you can see, I was blind to the extent that my lines and angles were off.  Only the tape showed me just how crooked they were.
Lily then proceeded to pull out her brushes and paint palette and go to work on the roof of my old homestead.  She explained that the detail of painting each shingle wasn't necessary but what was more important was getting the base colors correct and giving just the impressions of the tiles.  That was also her advise when it came to old wooden slates that the house is comprised of.
Lily giving me a lesson on how to improve my painting


I was amazed by her ability to add a few colors together and come up with the perfect matching color to use for those old green shingles.  She mixed Alizarin Crimson, Phthalo Green,  Black, and White to make the shingles.  We also added a blue tint to the path way to give it interest.  My other notes include- STAY AWAY FROM WHITE...and throw away your fan brush.  An angle brush works great because you don't have to paint every blade grass, rather give the impression of the grass.

My piece in it's current stage of transformation.  We have brought the one tree down into the foreground, added a stone wall, radically changed the grass and my path.  I am still working on lightening the grass and detailing some of the foreground. 
It was a painful couple of hours, but my resolve is to turn the PAIN into GAIN and remember that critique, no matter how painful, will make me a better artist.  After I finish this piece a second time, maybe I will start a second painting of this same house so that I can reproduce this effect on my own from start to finish.  Perhaps this view with some overgrown rosebushes and an old tire swing would make and interesting composition.  Practice makes Perfect...and I need a LOT of practice.