Thursday, March 31, 2016

It's Not Done Until You Put on the Dust Cover

Tools I used for finishing off the backs of my art work

I am always on a quest to bring my art to a higher level and there are steps to finishing off your artwork once it is created. These last steps are just so important to the presentation of your art and in many cases are often ignored.   My good artist friend Lily shared with me recently how she had observed that a framing shop she had patronized used a fabric as the dust cover to the pieces they framed.  This dust cover consisted of the black fabric that you find underneath your upholstered furniture and that she was switching from using paper (which easily tears) to using fabric to cover the back of all her work.

I ordered a bag of this upholstery material from Amazon and yesterday was my first opportunity to give it a try.  It turned out to be somewhat of a two man project to get the fabric attached but all in all I'm pretty pleased with the ending results.  When we opened the bag and got a closer look at the fabric we realized this looked very similar to a large roll of landscape fabric that we have.  I'm going to give that a try next to see if it works as well.  If so, the local garden store or hardware store may be my new supplier.

I first laid down a thin layer of adhesive using my Scotch brand Advance Tape Glider gun to the 4 sides of the canvas and in my case down the center support bar.  All of the pieces that I was working with yesterday measure 24 x 36 and I had 4 of them to finish off.  

Then my husband guided the long edge of the canvas to match the finished edge of the fabric while I held up the rest of the canvas to prevent it from sticking.  Once he had laid his edge down and was satisfied the everything was lined up, he took the canvas and held it while I stretch and smoothed the rest of the surface as tight as I could.  Happy with how the fabric was going to lay we dropped the other three sides onto the fabric so that the adhesive and fabric were now united.  We pressed down firmly all the sides assuring that the bond was good.

Now came the fun part.  Using my Fiskars fingertip craft knife,  I proceeded to cut the 3 edges, careful not to cut the canvas or myself in the process.  Logan makes a special dust cover trimmer that I plan to try out but the Fiskars cutter worked sufficiently for this job and I got a little more proficient at the process with each new piece.

We then flipped the piece over and my husband then used a staple gun to apply a staple at each corner while I prepared the certificate of authenticity that was to be attached.  I cut a 3 hole sheet protector in half and remove the holes to make a sturdy plastic sleeve that holds my certificate nicely and then I attach it to the back of my artwork using my Scotch Advanced Tape Glider gun.  We decided to allow the one corner staple to secure the certificate just to make sure it would stay attached and not fall off.  As you know when you are transporting artwork, no matter how careful you think you are being, there is always a problem with tags and dust cover paper being torn or falling off.  I feel that this fabric is much more durable and I like the professional way it looks.  

Now it's time to add the D-rings and hanging wire.  I measure 1/3 the way down on the canvas to install the D-rings and I use size 4 soft hanging wire.  I bought a large spool that measures 850 ft on Amazon and am so happy with that investment.  I hate the quality of the wire that you can purchase at the local craft and hardware stores and when you paint as much as I do, those small packages are always running out.  With 850' of wire,  I think I might have enough wire now to last me through the zombie apocalypse.

I would love to hear from you if you have questions or found this article helpful or if you have tried other products or have a process you think works better for finishing off your artwork.  I might include your information in a future blog post.  Leave me a comment here or email me.  Also feel free to check out my website for all my available artwork at Julie Townsend Studio or my Etsy Store at Julie Townsend Studio Etsy Store


To make this supper easy for you, I have included all the links to the tools and supplies I used :


Sunday, March 27, 2016

Heading Home


Heading Home- 12 x 24 Original Acrylic

Every year at this time I turn my focus to my entries into the annual Helldorado Art Show and Rodeo that is put on by the Elks Club here in Las Vegas.  It is about the best art show I have participated in and again this year I am looking forward to adding my entries to the assortment of great Western art that I know will be there. It is a great afternoon.

In this piece that I just finished,  I am trying to capture the excitement and strong emotion felt by both horse and rider as home comes into sight.  The curious cow paused from her grazing to stare as they quickly pass by.  

Even before urging from the rider, the horse has picked up his ears and quickened his pace.  His long black mane flows outward as it begins catching the breeze as he trots down that familiar road.  There is cool water, oats and sweet alfalfa waiting inside the doors of the big red barn.  The rider knows that very soon the aroma of his dinner cooking should soon begin filling the afternoon breeze.  It was a good run  and both horse and rider have enjoyed the freedom of their time together, but now it is time to be heading home.  

To see more about this and my other work, check out my gallery on my website at  Julie Townsend Studio Gallery

Tuesday, March 22, 2016

GRAB and GO STUDIO

In an earlier post I mentioned that I would talk about my portable art studio in a bag and so this morning I took this photo of all the contents spread out so that I could show you what elements  have added to my bag that I carry almost everywhere I go.


  • The BAG- I purchased this small shoulder bag at the local Wal-mart store for about $8.00.  It has several pockets and some sections inside to help keep my thing organized.  It is large enough that I can add small sketchbooks and even my iPad but not so large that I'm tempted to bring things I don't really need.  Not shown here but often in the bag is either my 24 piece Prismacolor 24 colored pencils or my Sakura watercolors field sketch kit, depending on what I'm doing.  
  • CREATIVE JOURNAL- I try to always have my creative journal close at hand.  You never know when a creative idea is going to strike and the last thing you want to do is write some life changing genius idea down on a napkin that will be discarded at some point without your knowledge.  Your great idea along with it.  
  • SKETCHBOOKS- I have two small artistic journals and a sketchbook that will allow me a creative surface no matter where I am.
  • ASSORTED DRAWING UTENSILS-  I think you can tell that I am partial to Prismacolor because my little can of drawing utensils have both multiple pens and pencils all from Prismacolor.  I have a kneadable eraser, pencil sharpener, a white Gelly roll pen, 2 painting brushes and 2 sizes of stumps for blending.  They are all housed in a little tin container that had beautiful hummingbird greeting cards in that I bought at Ross a number of years ago.  It's a perfect size and doesn't seem to give me problems with coming open when I don't want it to.  Functional and pretty, that's a win win in my book. 
  • CHARGER- I have an extra iPad and phone charging cords so that I can't be far from technology if my battery starts to run low.
  • MARKETING MATERIAL- I carry a few business cards, some invitations to my upcoming show and a few greeting cards I can give away if the opportunity arises.   VERY IMPORTANT!  Unless you are very successful as an artist or very wealthy and you can hire a manager, you are your own marketing staff.  Make it a habit to always have your business cards and giveaways with you. 


My Portable GRAB AND GO Art Studio in a Shoulder Bag

Saturday, March 19, 2016

Stipled Smiling Swine

"Lunch and a Spa Treatment"- Pen and Ink w/Colored Pencil

I will never give up painting but I have to confess that I am finding more and more pleasure in sketching.  This week I had a blast drawing this smiling pig standing in the middle of a mud puddle while chopping on a tasty apple.   Her eyes are closed in anticipation and you can see a slight smile across her face as you know she is imagining the crisp crunch and sweet flavor that will soon be her experience.  If this little sketch of mine has brought a smile to your face then I have accomplished my mission.
Sketch in Progress


I started her in the morning, worked on her for a few minutes during my lunch break at work and then couldn't wait to get home to finish her up.  She is drawn on a 9 x 12 Canson Bristol paper with pretty much using my Prismacolor Fine Line Markers exclusively and the .005 size the most.  It is a lot of inking but I find the process relaxing, probably much in the same way that those adult coloring books have gained in popularity.  I just love using the stippling technique but it is rather time consuming when you think of the thousands of little dots necessary to fill in a sketch.  I will be adding just a little color to the scene by adding red to the apples, a light tint of green to the grass and some shading to give her depth.  I will probably use my Prismacolor colored pencils to add the coloring.  

The whole time I was drawing this I had a smile on my face as I kept thinking of funny captions and titles but I think I've settled on "Lunch and a Spa Treatment".  I can't wait to add this gal to my new line up of greeting cards and prints for my "Down Country Roads" series and solo show coming up in April at the Boulder City Gallery.  The original of all my sketches are available until they are sold. Prints and greeting cards are available at JulieTownsendStudio.com and I'm also have an Etsy Store.


Finished sketch before I added color


Wednesday, March 16, 2016

Something to Crow About


Something to Crow About
It was bound to happen.  I've been blogging about the progress I've been making on my most current piece for several weeks and this weekend the final paint strokes were made and my signature added.  I moved the piece off my easel so we could start on all the final steps of photos, varnish and preparing the piece for hanging.  

There is a mixed feeling of satisfaction and anxiety involved with this final process.  Satisfaction that the piece turned out as well as my skill level will allow.  That I have poured your heart into every step of the process and now I have the tangible evidence of my labors sitting propped against the wall.  

The anxiety for me comes in with the empty studio easel.  I don't like the feeling of not having a work in progress and the what-if's and unknowns until I have worked out the renderings for my next composition.   I like the control of knowing what I'm working on and feel a bit uncertain when I can't peek in my studio door and know what I have to do next.  Top these feelings with the reality of the March calendar and that I only have 2 weeks left until I have to hang my show.  Can I finish something substantial in these two weeks or should I just focus on small fun pieces, cowbells and using my new printer to add to my inventory of cards, magnets and prints?   I think the reality that I must face is that I will only have 4 focal pieces for my show when I had planned on creating 5.


Being raised in the Ozark Hills of Central Missouri I can tell you that I'm just having a blast painting these cute country scenes.  So you can put your mind to ease that I will continue to paint with this theme for some time into the future.   I'm actually hoping for more venues to open up that will allow "Down Country Roads" to be on public exhibit in the future.  I already have several ideas for my next morning glory covered fence line.

"Something to Crow About" is now available on my website in my landscape gallery.  Check out my other works while you are there. Just click here:  Julie Townsend Studio or on the gallery tab above.  If you are interested in purchasing an 11 x 14 limited print of any of my artwork, just send me a message and I will be happy to work out the details.   


Tuesday, March 15, 2016

5 Years of Blogging


This past week marked the 5th year anniversary of my very first blog post.  Since that realization, I have been considering what that means to me and how much my life has changed in that short time.  I know that I have learned so much as an artist and yet I hope to continue to learn in the years left to me.  

As I read these words, I am mindful that they may have been penned some years ago but they still ring true for me and affirm the desires of my heart.   I want to continue to develop and discover the creative gifts that are God given and keep them burning strong in my life.  It has definitely been a journey and blogging has been an additional creative outlet for me.  I find that writing entries for this blog, sharing my art with you are ways for me to record that journey and hopefully inspire and encourage others to find their creative passions.  It's never too late to become and artist!


My first blog post from 2011....


"Whatever you do, work at it with all your heart, as working for the Lord, not for men.  Colossians 3:23  I think as I get closer to my soon approaching 50th birthday, I am mindful about legacy and mission, purpose and value of a my life.  What have I done on this Earth with the time that God has given me.  Will I be remembered for how well I balance the church checkbook or for how clean my house has been?  


I don't think so...It is the creative part, the passion in your life that brings impact to those that remain after you are long gone.  I think that is partly why I am so driven to improve my artwork.  Besides my influence of others by my Christian example, it is my art that I believe will define me in the memories of those that are left to eulogize  my life.  There is an urgency in my heart to take my work to the next level.  I want to leave little pieces of my heart framed and hanging on a wall for everyone see it, appreciate it and remember me by.  Will my grandchildren stop and tell their children that this is one of your Grandmother's beautiful paintings?  Will they say that "She loved the Lord and honored His creation by painting beautiful pictures?"  Time will only tell, but in the mean time, I need to keep practicing."

Saturday, March 12, 2016

Drawing a Crowd


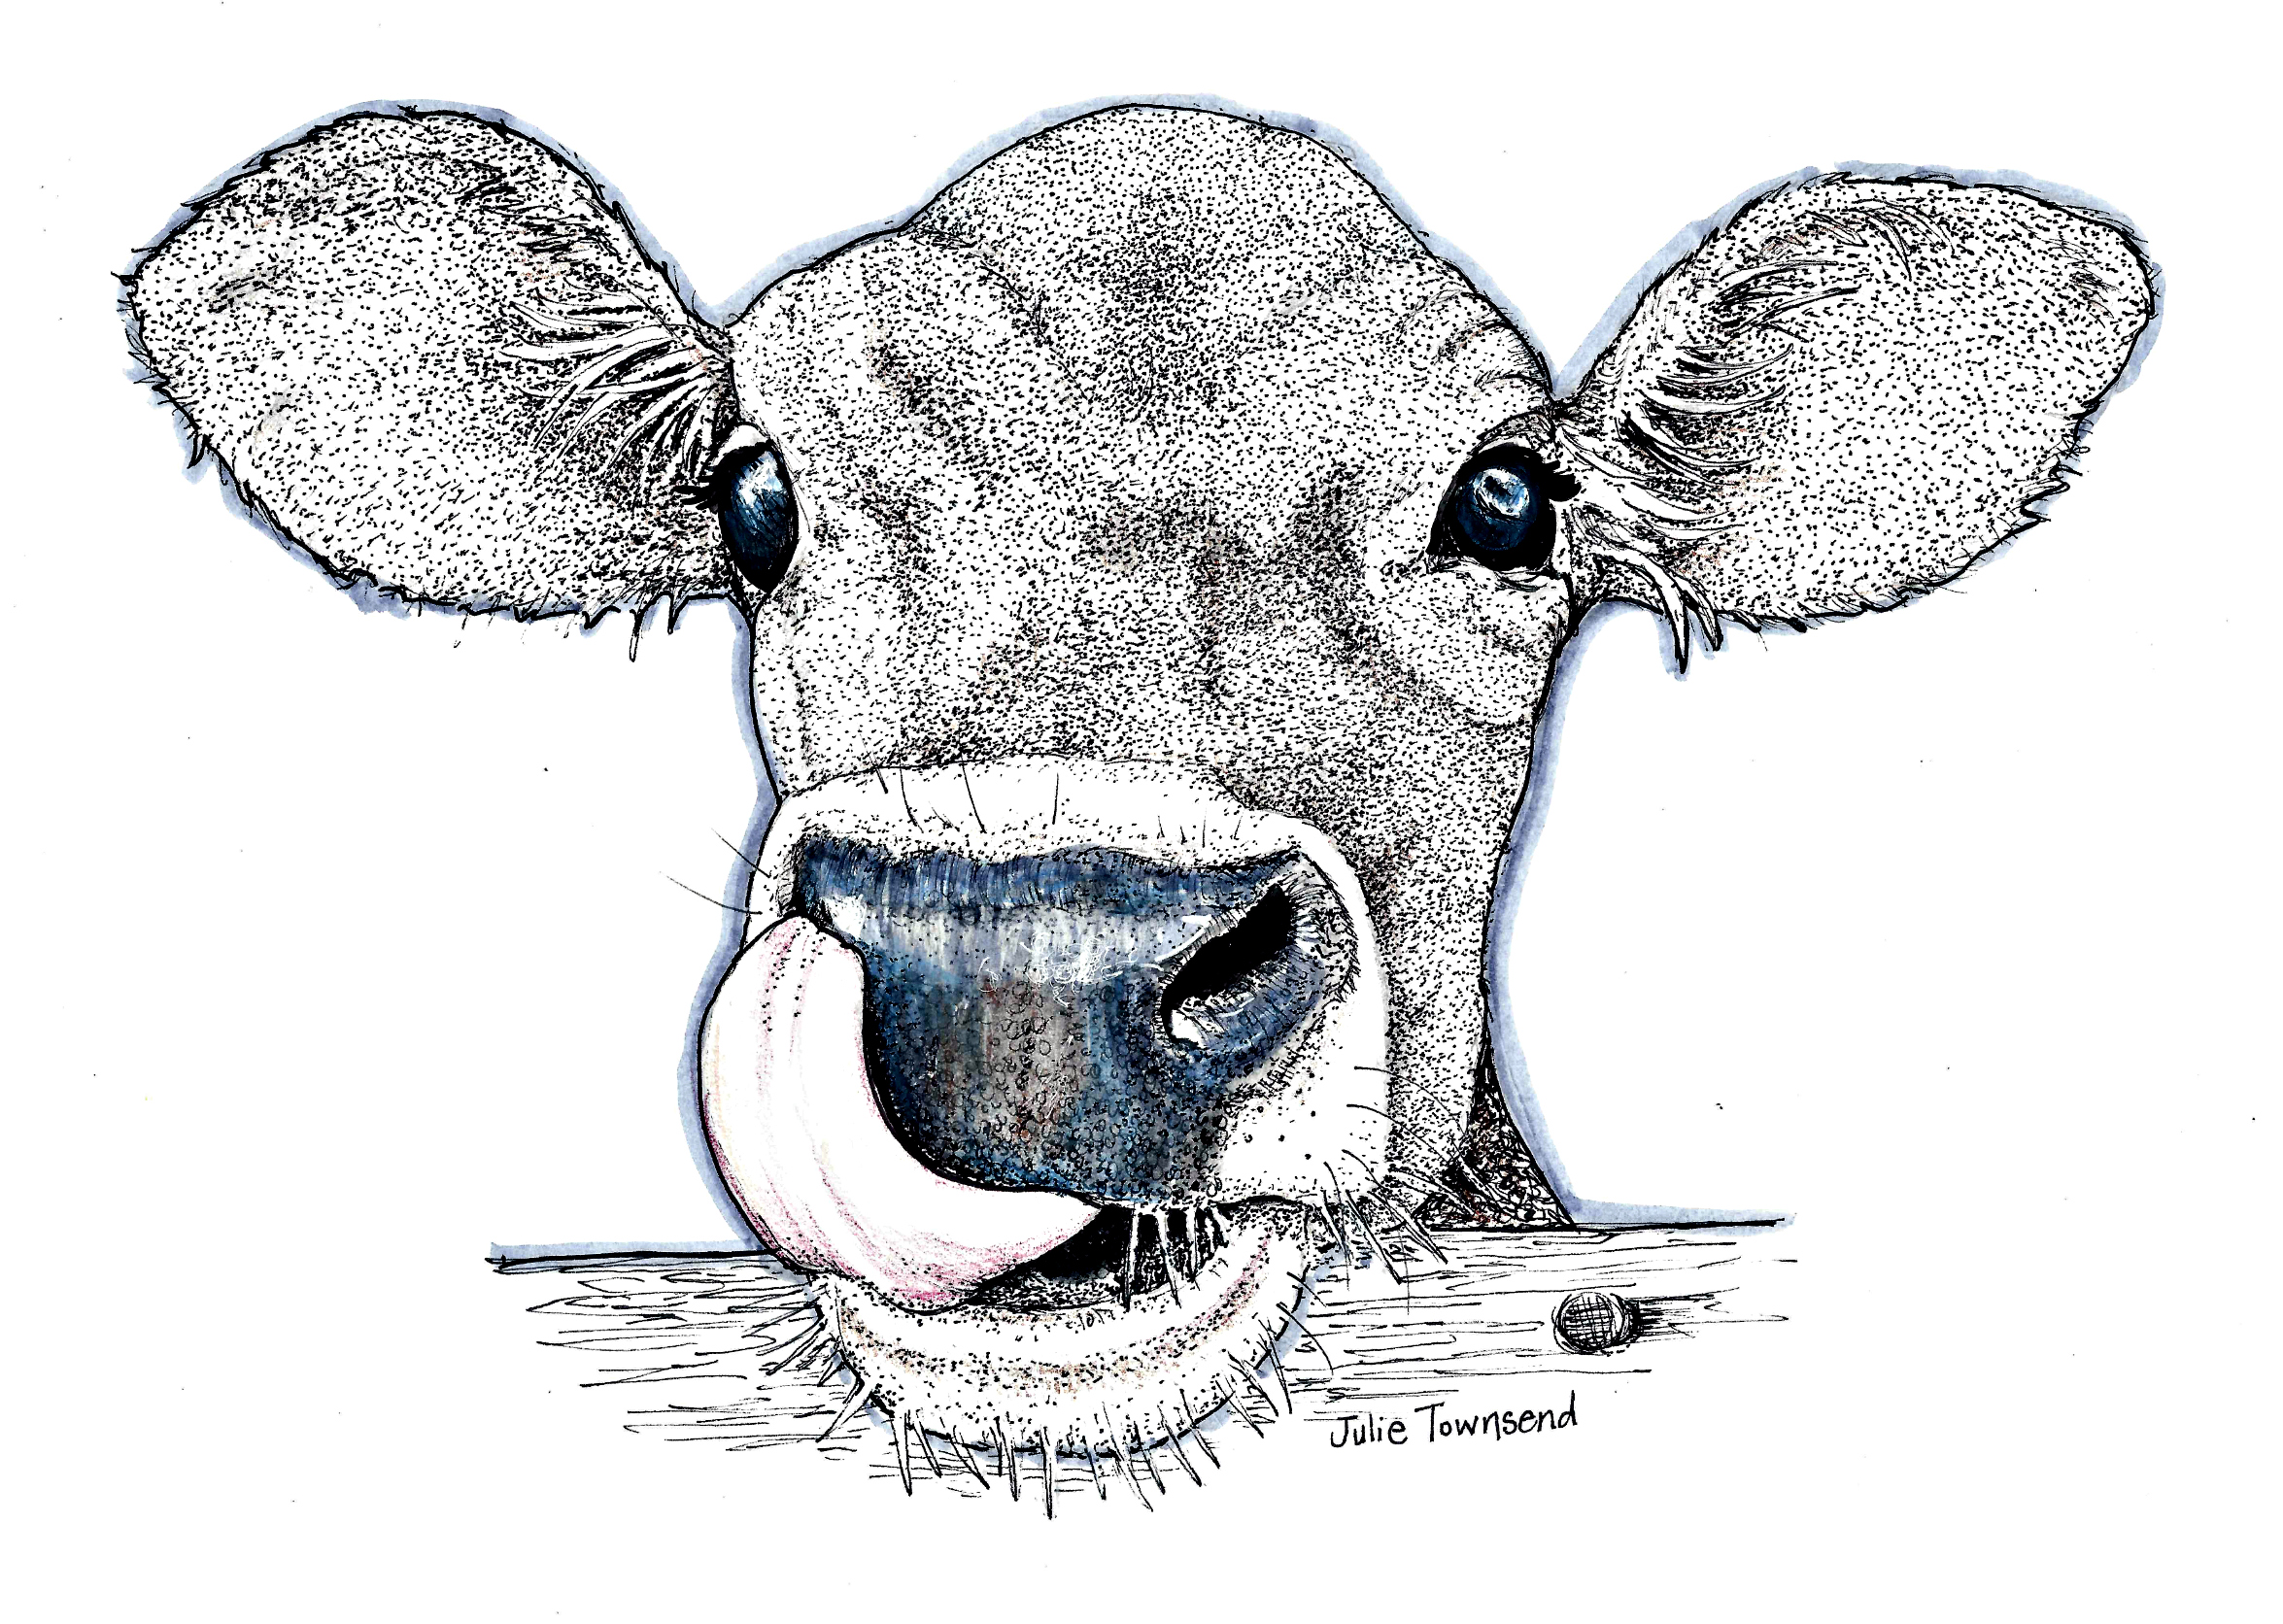
I took a few minutes the other day to finish up a sketch I started the previous day of a nose licking calf.  The sketch is on Canson Bristol paper and is primarily done with my Prismacolor Fine Line Marker .005 using a stippling technique that I just love to use .  It is time consuming but I find the repetition very relaxing.  I can quickly get into the "ZONE" with my sketchpad in front of me.  I also lightly tented the drawing later in my studio with a Tombow marker and my Prismacolor pencils and overall very pleased with how it turned out.
I have found, as a busy artist, grandmother and working part-time as an accountant that I must seize the opportunities presented me to be creative.  Because of this, sketching is a perfect solution.  Dragging my rolling art case, easel and canvases everywhere is just not practical. So I have developed the habit of caring a portable drawing kit that I've made up with me everywhere I go. (I think that will be an excellent future blog)   As it is my custom habit on many mornings to be found enjoying my favorite cup of coffee and the free WiFi I can often be found at none other than McDonalds writing this blog or sketching in my sketchbook.
Coffee in hand, It wasn't long before I was into the zone only to become faintly aware of the fact that I could hear voices behind me and I looked up to find a young man, red-haired and freckled face standing there.  He looked to be about 11 or 12 years old.  I could tell with his father's encouragement he came over to me to tell me that he really liked my drawing. I smiled and thanked him.   How sweet is that?
A short time later a small group of African-American ladies had also taken up a position behind me.  The obvious mother of the group shared with me how her daughter likes to paint and the she proceeded to use me as an example of how how her daughter needed to keep practicing her artistic skills.  I thanked them and gave them an invitation to my up coming solo art show next month.
What a positive morning that was.  I can honestly say that "It made my day!"  I love sharing my love of art with young people.  Well honestly if you're even anywhere close to ear shot and still breathing I would enjoy talking to you about art in general and specifically my art.  I guess that is why I love this blog and have spent the 5 years now writing it.
Who Needs A Tissue C
"Who Needs a Tissue"-8 x 10" pen and ink sketch
The original artwork of "Who Needs a Tissue" is available for sale and is matted to an easy to frame 11 x 14 inch size.  Prints and blank greeting cards are available at Julie Townsend Studio or  Julie Townsend's Etsy Shop

Friday, March 11, 2016

Something Has Gone AFOWL in the Studio


I thought you might enjoy seeing my progression on a piece that I am almost finished with.  It's been about a 3 week process because I don't paint very steady.  A little bit here and a few minutes there is my normal studio habit.  I want to work on that this year but I find I get pretty restless and need to get up after only 20-30 minutes of painting.  I've yet to find that "zone" that other artists speak of where they paint for hours on end and late into the night.  


Photo 1- Initial Rendering

This is my first rendering that I did in colored pencil.  It is certainly not a fine piece of artwork but here I'm not really looking for detail as much as a feel and mapping out some of the composition.  I knew I wanted it to be about a crowing rooster on a wooden rail fence with an old wagon wheel.  The piece also had to have the signature morning glories that I have painted into the three other pieces in this "Down Country Roads" series. (Photo 1)


Photo 2-Rough Blocking in of the composition
This next photo is now of me blocking in the main elements of the composition.  I had to repaint that fence at some point because I realized I had made the classic mistake of letting it drift upward and I needed it to be straight.  I pulled out the trusty straight edge and got it back on track.  The background took me sometime to work out.  I finally decided on a the distant ruins of a barn and I think that was a good choice here.  Because I'm working with the canvas in a vertical position, I have a lot of depth to fill in the background. (Photo 2)


Photo 3- Adding Focal elements
With this photo you can see I've straighten the fence line and now begun focusing on the wagon wheel.  This proves to be a really challenge because I want it to have the illusion of leaning against the fence and so my perspective isn't straight on.  I'm not a draftsman or architect so getting the wheel to appear correct and balanced is an issue.  I choose to let it go off the page because it really needed to be that large in comparison to the fence post to look realistic.  I still think it may be too small but that is the difficulty I often face when painting a number of random items from reference photos that are not in the same setting.  (Photo 3)


Photo 4- Adding flowers, grasses and foreground hens
Now we are getting into the final elements of the composition.  I have decided the best thing to do to handle my lack of skill at painting circular wheel and spokes is to have an old board also leaning up against the fence with a healthy growth of beautiful morning glories.  All in all I'm pretty sure I made the right decision there.  I have also begun blocking in the two hens in the foreground. (Photo 4)

Photo 5- Rendering of details to add
This is a little rendering I did of what I had in mind of adding to my painting.  I wanted a couple of chicks fighting over a juicy worm for breakfast.  The sketch has also been added to my greeting card designs and I've matted and framed the original.  The resourceful artist and accountant in me will not let a good sketch go to waste lying in a forgotten portfolio but rather try to turn it into a future revenue source. (Photo 5)


Photo 6-Still blocking in the composition and adding depth
In this photo you can see I have blocked in the chicks and added more layers to the hens and depth to the morning glories and foliage.  (Photo 6)

Photo 7- And this is what it looks like today
 So here we are today and I'm entering into the final stages of this painting.  Did I mention that this canvas is 24 x 36"?  That is a rather large piece and so it does take sometime to work your way to the bottom.  Now I'm obligated to focus on all the details that still need to be added to make this piece really pop.  With a little effort I'm hopeful that this piece will be finished by the weekend and soon be available on my website.  I've taken you from "What the heck were you thinking" to "This might just work after all" to finally "I'm Lov'in it" all in 7 photos.  That is the normal progression for me as an artist.  It progresses from Awful-to Awkward-to Amazing!  Well at least we hope for the AMAZING part.

If you enjoyed my little assemblage of progression photos, leave me a comment below and take a minute to check out my website at JulieTownsendStudio.com.   


Wednesday, March 2, 2016

Be Sure to Eat All Your Vegetables


I started this little sketch yesterday morning while enjoying my favorite McDonald's coffee, thought about it all day while I was at work and finished it up while I was eating my dinner and watching NCIS series on Netflix.  Sometimes you create something that makes you excited and this piece is that for me.  I couldn't wait to share it with you this morning on my blog.

The overall size of the actual sketch is about 8 x 10" so that larger size made the fur a bit daunting.  I used a combination of hatching and stippling to give it that textured fur look.  The challenge for me came in when approaching the lighter areas because I had to have good control of the pressure on the pen so the ink tapered to a place that was barely visible and yet still  giving the impression of fluffy soft fur that you know this little guy has.  I also wanted the carrots to stand out from the bunny so at the end I took the plunge and used a darker bolder line.  Ink is not forgiving so once you make a decision there isn't much ability to turn it around.  With acrylic and oil painting you can create detours and exit plans all day long that are just not afforded to you with this medium.

My focus for the past few months has been creating art that reminds me of my childhood growing up in the Missouri Ozarks.  My brother and I raised rabbits for several years.  In the winter that was a particular challenge as the rabbit hutch was situated at the edge of the clearing that was our yard and the top of a particularly large hill.  I remember several times the ground covered in ice and I having to work my way to the hutch by grabbing on to tree after tree to keep from sliding down the hill.  Good memories.

I'm working on my 4th large 24 x 36" acrylic painting but I have also added a number of sketches that are waiting to make their public debut.  I have a solo show coming up in April in Boulder City Nevada that I am calling "Down Country Roads" and this piece will most likely be matted and framed for that show if it is not sold before that time.  I want to have a number of cards and prints available and this bunny will make a great addition to the lineup I think.  My hope is to make my cards and matted prints of my sketches available on JulieTownsendStudio.com in just a few days.  I just received my new Canon Pixma Pro 100 printer last week and I'm working hard to get up to speed and bond with this new studio addition.

4 designs that I have already developed in my series.  These are all hand tinted and packaged and will be sold individually or in a group.