Sunday, November 25, 2012

Passion, Purpose, Persistance and all those other "P" Words

Passion" hasn't been a word that I would think many of my friends would use when describing me.  When I look up the definition of the word in the Merriam-Webster Online Dictionary I find one of the definitions listed as “intense, driving, or overmastering feeling or conviction”.  Obsession would also be a synonym of the word I think.  Remember, if you have read my bio you know that I’m not an art major but rather have a business degree.  I have also spent the last 27 years working as an accountant for a church and Christian School.  You can’t get more conservative than that.  So I have always used adjectives when describing myself with words like detailed, accurate, organized and honest.  While I hold deep convictions about my faith and principles, outward displays of passion have not been very visible. 

I picked up a paintbrush again just a little over two years ago after a 30 year break.  From that point I have felt a change in the way I viewed things around me.  I call it “Looking through my artist eyes.”  I began to view my surroundings in heightened detail and appreciation because I was always thinking about how I would paint that or what colors would I mix together to get that shade.  It is as if my thought processes have been transformed.  I look at this amazing world that God has created with a new wonderment and for that I am so happy to have opened the doors once again to my creative self.

Today, I was looking around some artist blogs for inspiration and ideas to improve my own blog and I came across this quote by an artist named Cheryl Anderson.  I felt her words accurately described what painting has become for me in my life and I wanted to share it.  Painting is truly an obsession for me. Almost every thought I have is never more than two steps removed from painting.” (http://cherylandersonart.blogspot.com/)

I am on the very edge of my retirement and so here I am within a month of starting a new journey and I have no idea if my art will ever be more than a hobby.  I dream that it will,  but the important thing is that I give it my best effort.  I believe that Purpose in your life comes when you follow Persistently the Passion that God has put in your heart.  

Enjoying a beautiful Nevada morning

Thursday, November 22, 2012

Light and Contrast


Taking private painting lessons would be a complete waste of money if I didn't apply the things I learn in each following painting.  In seven lessons, I have really only accomplished one painting to completion, but I have taken several pieces that I have completed independently to have them evaluated.  As I have blogged on previous occasions, my instructor, Lily Adamzcyk gives a brutally honest critique of each work.  Techniques have been analyzed such as how to paint specific elements like grass, water and never use white to brighten.  Probably the most important lesson I have tried to implement is that of light and contrast.  For a painting to have depth and interest you must have both. 

Keeping that in mind I began working on this large piece that was inspired by a fall hike that I took with my son and daughter-in-law near Reno.  The colors were just beginning to change and the birch trees nearly glowed in contrast to all of the darker pines.  The bright morning sunlight filtered across the trail whenever the foliage gave opportunity. 

Because of their prominence in the composition, you would first think that my main focus here is the grouping of the three birch trees near the trail but in actuality, it is the sunlight that is really the star here. I have attempted to show the trail and grass highlighted by the sunlight in a number of locations.  It is almost as if you have walked out of the darkness and into the light as the trail absorbs the energy and warmth of the morning rays.  This energy continues as the trail briefly disappears only to return brighter as you are prompted to continue up the mountain.

At my next lesson, I am sure that there are refining details that Lily will use to help me improve this piece but I think that she will immediately know that I have been listening.


24 x 36 Oil- "Morning Sunlight"

Monday, October 29, 2012

Watch Grass Grow

I have blogged a number of times about my painting lessons that I am taking with a very talented local artist by the name of Lily Adamczyk.  If you have followed any of my former blog posts you know that I have been painting only for the past 2 years and have been using acrylics up to this point.  Taking lessons from an accomplished artist and learning a new medium like oils can open one up to a new level of critiquing that facebook friends or family dare not provide.  In their defense 1. they probably don't want to hurt my feelings and 2. even with all my bad habits I demonstrate a level of skill they may not have themselves.  

I chose for the subject of my first solo oil painting a field with three longhorns.  Well, actually two longhorns and a calf.  We took this photo somewhere along the road while traveling in Nebraska.  I loved the look these bovine gave us as we forced my 14 year old niece to stand in a field of corn so that we could take her picture. You don't come across too many fields of corn in the Nevada desert so we made her pose all across the countries bread basket states.  Actually, now that I think about it, I haven't seen too many longhorns in Las Vegas either.  Regardless of what crazy things we were doing to make them stare at us like this, I loved this photo and knew immediately that I wanted to try and paint it.


So as I began painting out my scene on the blank canvas, I couldn't really get around the fact that my subject was surrounded by a great deal of green grass.  I decided to split that up with a small stream running across and to have a distant barn on the horizon.  As I posted this painting on facebook, I received a number of compliments about the way I painted my grass.  So, I proudly carried my partially completed work to my most recent painting lesson so that Lily could get a close up look at my masterpiece.  I was sure the she would like the way I handled the long grass in this composition because I tried to follow her instructions on the painting I had done previously that I call "Memories of the Road Home".  Boy was I WRONG!!! 


Lily's first comment to me was that she see me making this mistake all the time and she is going to break me of my bad habits, especially when it comes to painting grass and having things springing up from the edges of my canvas.  I guess that meant that she didn't like the tree I added in the corner.

The first correction she had me do was to add more contrast to the grass areas by adding brown squiggly lines in different directions. After these are completed, I'm going to come back in with a light ochre to simulate the grass that has gone to seed in my photo.


With this close up, you can see that I have started adding the contrast to the grass and have worked to DEFINE the BOVINE by darkening the shadows and highlighting the areas that are being impacted by the sunlight.  I can honestly say that this action has resulted in a marked improvement.  Lily is always right.

This is close up of an area that I have not yet added the contrast and I can see what a difference this makes in the overall feeling of the grass.  

I was thinking about the fact that for so many year I have not viewed nature with "ARTIST EYES" and now I am trying to interrupt what my memory remembers it to look like.  The randomness and imprefections that exists in nature is missing from my pieces because I'm trying to interrupt it and not really obeserve it.  What I really need to do to improve my paintings, is get outside and literally "WATCH GRASS GROW".

Nosey Girls- 18 x 24 (Oil)

Tuesday, October 9, 2012

Hummingbirds 6 inches long

I know that I'm not the only one that finds great joy in watching the hummingbirds dart around the feeder.  These tiny creatures pack a super attitude as they dive bomb each other, chattering and scolding as they fly past.  I'm fortunate because in Las Vegas these little guys hang out all year round.

Hummingbirds have been a recent favorite painting subject of mine.  Most paintings I have observed that contain this aerial acrobats usually have a canvas full of colorful flowers and showcase these tiny winged jewels.  My idea was to compose the piece by having the flowers dwarfed by the bird himself.  Hence comes my 6 inch hummingbirds.  My friend Doug Beck from Seattle Washington has taken some fantastic photos of hummingbirds and with his permission I have used these photos as my inspiration.  Check out his work at http://desertbighorn.smugmug.com/.  You will be very impressed with his photos.

Hummingbird I- 24 x 36


Hummingbird II- 24 x 36
Both of these paintings are for sale on my website at JTownsendStudios.com if you want to check them out.  I know that I have several more paintings coming in the future that feature lots of bright flowers, feisty little winged creatures and an abundance of green.

Tuesday, October 2, 2012

Network your artwork

Last night, I was sitting at a board meeting of my local art guild that I serve as treasurer for and I was considering the value of networking.  After all, that is the main reason I joined the guild in the first place. One individual present who just so happens to teach classes on the social media site Facebook stated, "You should never post pictures of your entire artwork because the risk that you creation will be stolen and used without your permission.  Also the public won't want to come see your exhibitions because they have seen everything you have to offer on the internet."  As I glanced around the table at all my fellow artists, I knew that I was probably the only individual sitting there that happily shares each piece of art as I complete it on a regular basis.  

I have taken the approach to chronicle my creative journey that I am embarked on.  Partly as a method of journaling my progression and also hopefully by inspiring others to pick up a brush, a canvas and just go PAINT! Grab your camera and shoot pictures of the first thing that grabs your eye.  Pick up that sketch pad and a pencil and just start drawing.  The important thing is to get creative.  Your life and those around you will be greatly enriched.

There is freedom in letting that creative person emerge after years of ignoring him or her.  If my posting one piece of art, blog about something I have learned or sharing a problem that I am currently struggling with results in someone letting their buried passion be stirred, then I happily post my work, the ENTIRE painting.  After all, we have all heard that "Imitation is the highest form of flattery" and while I'm not hanging in galleries or supporting myself by the sales of my artwork just yet, both are on my goals list. Maybe my thoughts will change as I get closer to my goals but right now, I just want to share the things I learn and be transparent because I hope that others will learn along with me.

This is also my motivation with this blog.  I watch as people from all points of this planet, open my pages.  I would love to hear more from my readers if there is something that is helpful or if I made you chuckle because you can identify with what I am feeling.

I end this blog post with a photo taken of me enjoying a beautiful Utah afternoon trying to look as if I know how to be an artist plein air style


Sunday, September 23, 2012

Back to the basics-WAY BACK!

This blog is somewhat of an embarrassing blog to write because it requires that I make a very personal confession, "I have dirty brushes."  Okay, there I have said it for the world to read and so now I can move forward towards my recovery.

You would think that somehow along this journey to becoming an artist, I would have learned how to properly maintain my brushes, but I guess not. I only remember in high school art class washing my brushes in the sink under running water and doing that only until the water ran clear.  I thought that was all there was when it came to brush care....(I will continue this blog as soon as you have stopped laughing.)

I became suspiciously aware of the fact that there just be a bit more to paint brush care when I started taking formal painting lessons.  Each week, I would arrive to Lily's house to have sitting before me my unfinished painting, a clean palette with little colorful blobs of oil paint and 5 or 6 paint brushes that all had bristles that were well rounded, a sharp point or had a nice sharp edges.   The bristles were stiff and a frankly a joy to paint with. I know that a number of my brushes are very old but I have found that when I buy brand new brushes, that before you know it, the edges of the bristles are spread apart and I no longer am able to paint a nice straight detailed line.  Even after trying to shape the edges, while the bristles were wet and allowing them to dry on a flat surface I would still have brushes that were far from what Lily had.  So a couple of weeks ago I decided to swallow my pride and ask Lily for help.
 
The paint brush exorcism took place yesterday at the end of my painting lesson when I painfully submitted my brushes to Lily's scrutiny.  During my 2 hour lesson, my brushes soaked in cleaning solution suspended by a wire hanger.  Just before I was to leave, Lily and I went to her kitchen sink where she pulled out a tub of brush cleaning soap and began to squeezing the bristles and rubbing the brushes vigorously in the palm of her hand.

To my horror, old paint that had worked its way into the ferrule of my brush began to turn the white soap lather into a nasty green-gray color.  I think I heard Lily mutter something under her breath about never having seen such dirty brushes. 
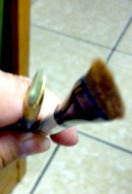
Yes...that is suppose to be a 3/8 Angle Shader on the right that I apparently have ruined in comparison to a #6 angle brush that with my new gained knowledge won't ruin.


So here is what I learned about brush care:
     1.  If the brushes are really dirty you will need to soak them in a brush cleaner solution perhaps as long as overnight.  I definitely think that describes my current situation.  You want to us a brush washer that allows you to suspend your brushes in the solution without covering the ferrule of your brush.


2.  Use a brush soap and get the bristles well lathered.  Rub the bristles vigorously in the palm of your hand then squeeze the bristles between your finger and thumb nail to work the old paint out from deep within the base of the bristles and the ferrule.  Repeat until your soap lather is white.  Leave some lather on your bristles to work as a sizing to allow you to form the desired shape with your fingers.


3.  Lay the brush flat on a paper towel to allow to dry.  Don't stand them up on the end of the handles as the water will stay in the ferrule and will eventually cause damage to your paint brush handle.

 Now is when the fun really begins.  I am off to the store to purchase the necessary items and then I will begin the long process of trying to save my brushes by soaking and soaping them back to life.  As you can see, I have my work cut out for me.

Sunday, September 2, 2012

No Pain-No Gain

Yesterday, was my scheduled 4th painting lesson.  I was anxious to progress on the current oil painting that I am working on of a fallen tree up on Mt. Charleston.  The difficult thing for me when it comes to taking these lessons is that I feel insecure because (1.)  I'm painting in oils and (2.) my natural approach to the subject is very different from that of my instructor.  Each step of the way she gives me instructions on the next process in the piece and often I don't produce the result that she is wanting.  Either I am trying to be too detailed, over doing it or not doing enough.  This can be frustrating, but as I have stated many times, I am self-taught and obviously in many aspects, self-taught incorrectly.  Bad habits can be hard to rid oneself of if they are deeply ingrained and apparently my bad habits have very "deep tap roots".

I was excited to take along my most recent painting that I call, "Memories of the Road Home" and one of which I have been very happy with. As I painted this one, I had tried to remember the points I have learned in the book I am reading by Margaret Kessler entitled, "Painting Better Landscapes" and the things I have learned so far in my 3 previous painting lessons that I have taken with Lily Adamczyk and all in all I thought I had done a pretty good job.  Boy was I mistaken!
This is my original painting that I had completed that I am calling, "A Memory of the Road Home".
I was sure that Lily would discuss a few things that I could improve on to make it a better landscape painting.  After all, there could only be a few minor changes that I could do to improve it because the overall piece was done well, or at least that was what I thought.  It was the last few minutes of my lesson when Lily suggested that we take a look at what I had brought along.  She picked the canvas up and in a matter of 30 seconds or so she said..."Do you mind if I...." and she grabbed a roll of masking tape in her other other and began placing pieces of tape in different directions on the surface of my canvas.

Lily said that when you are painting buildings it is very important that you emphasize angles and lines and the best way to insure that they are straight is by using masking tape.  As you can see, I was blind to the extent that my lines and angles were off.  Only the tape showed me just how crooked they were.
Lily then proceeded to pull out her brushes and paint palette and go to work on the roof of my old homestead.  She explained that the detail of painting each shingle wasn't necessary but what was more important was getting the base colors correct and giving just the impressions of the tiles.  That was also her advise when it came to old wooden slates that the house is comprised of.
Lily giving me a lesson on how to improve my painting


I was amazed by her ability to add a few colors together and come up with the perfect matching color to use for those old green shingles.  She mixed Alizarin Crimson, Phthalo Green,  Black, and White to make the shingles.  We also added a blue tint to the path way to give it interest.  My other notes include- STAY AWAY FROM WHITE...and throw away your fan brush.  An angle brush works great because you don't have to paint every blade grass, rather give the impression of the grass.

My piece in it's current stage of transformation.  We have brought the one tree down into the foreground, added a stone wall, radically changed the grass and my path.  I am still working on lightening the grass and detailing some of the foreground. 
It was a painful couple of hours, but my resolve is to turn the PAIN into GAIN and remember that critique, no matter how painful, will make me a better artist.  After I finish this piece a second time, maybe I will start a second painting of this same house so that I can reproduce this effect on my own from start to finish.  Perhaps this view with some overgrown rosebushes and an old tire swing would make and interesting composition.  Practice makes Perfect...and I need a LOT of practice.